I spent $0 on party decorating skills growing up. My idea of decorating for a birthday was taping a few balloons to the wall and calling it done. The balloons would slowly deflate throughout the party, sagging lower and lower until they looked like sad, wrinkled faces judging the quality of the celebration. It was not great.
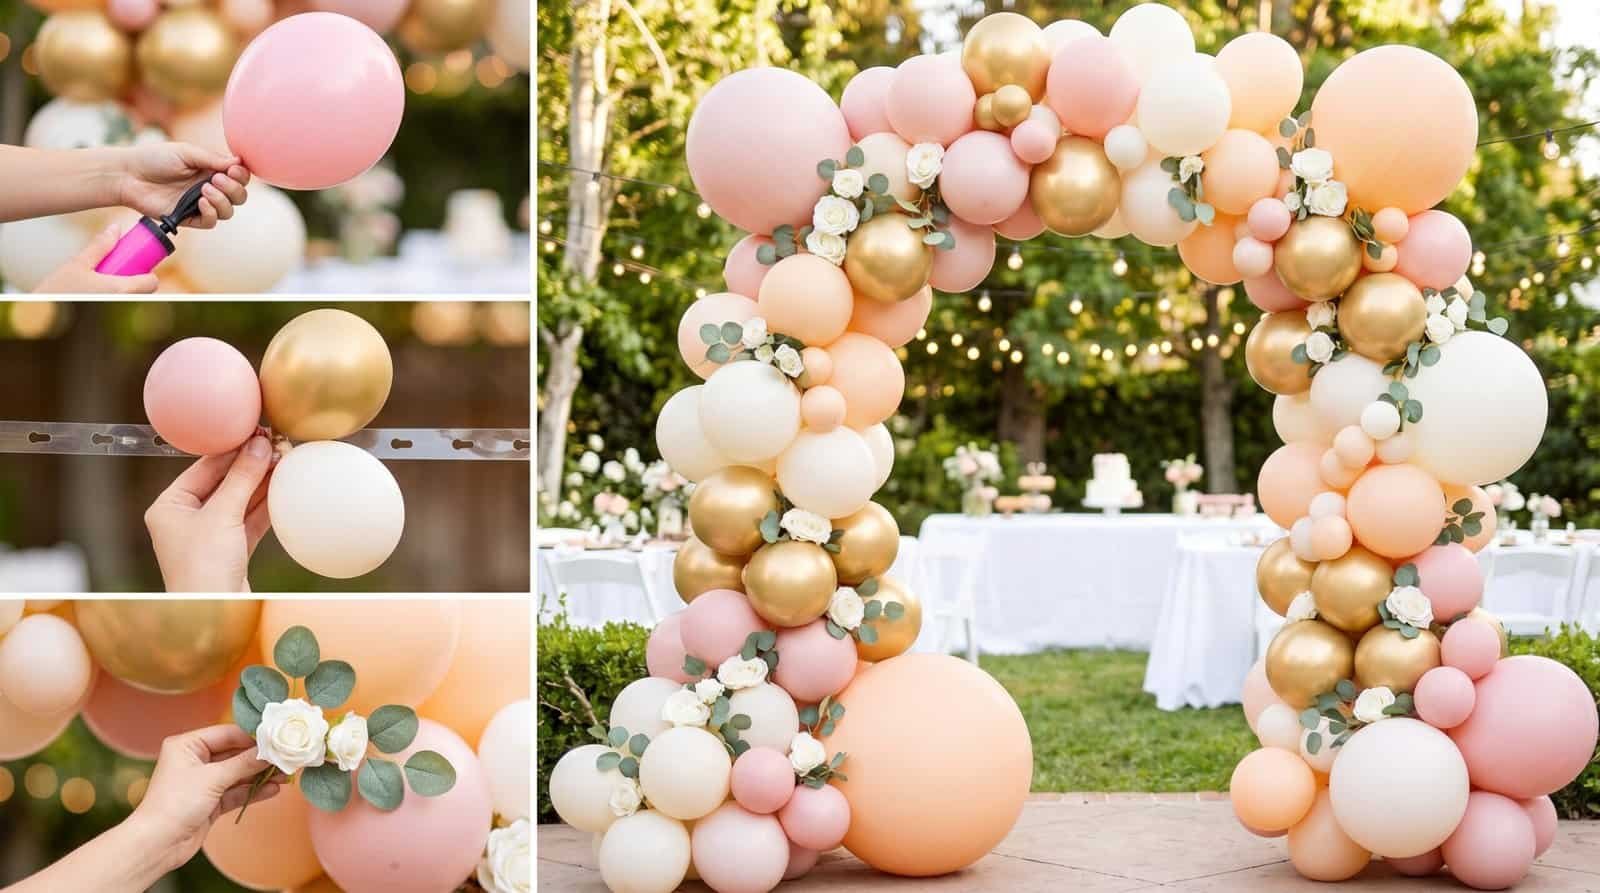
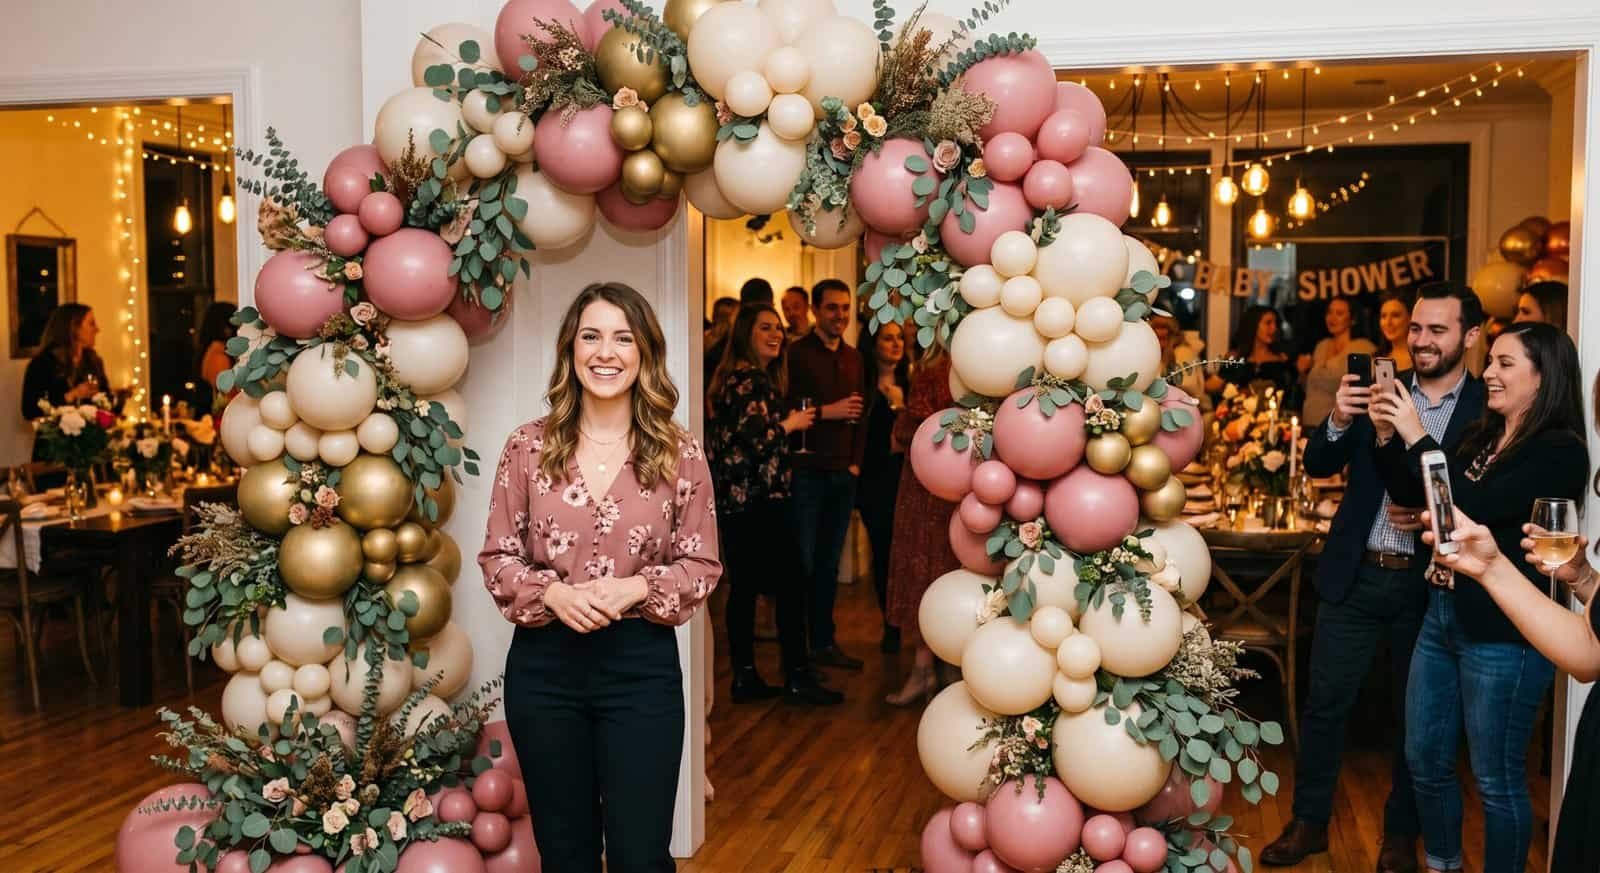
Then my sister asked me to help with her baby shower, and she showed me a picture of what she wanted — a lush, organic balloon garland arching over the dessert table in shades of dusty rose, cream, and gold. I looked at the picture and then I looked at her and said, “That costs at least $200 from a professional, right?”
She laughed. “I bought everything for $14. We are making it ourselves.”
Two hours later, I stood in her living room staring at a balloon arch that looked like it belonged in a magazine. Lush, full, professional, beautiful. Fourteen dollars and no special skills. Just balloons, a plastic strip, a hand pump, and a YouTube video on my phone that I paused approximately forty-seven times.
Since that day, I have made balloon arches for birthday parties, weddings, graduations, baby showers, holiday celebrations, and one very confused dog’s adoption anniversary party. I have gotten faster and better with each one. And the reaction is always the same — guests walk in, see the arch, and say “wow, who did that?” And when I tell them I made it myself for under $20, they do not believe me.
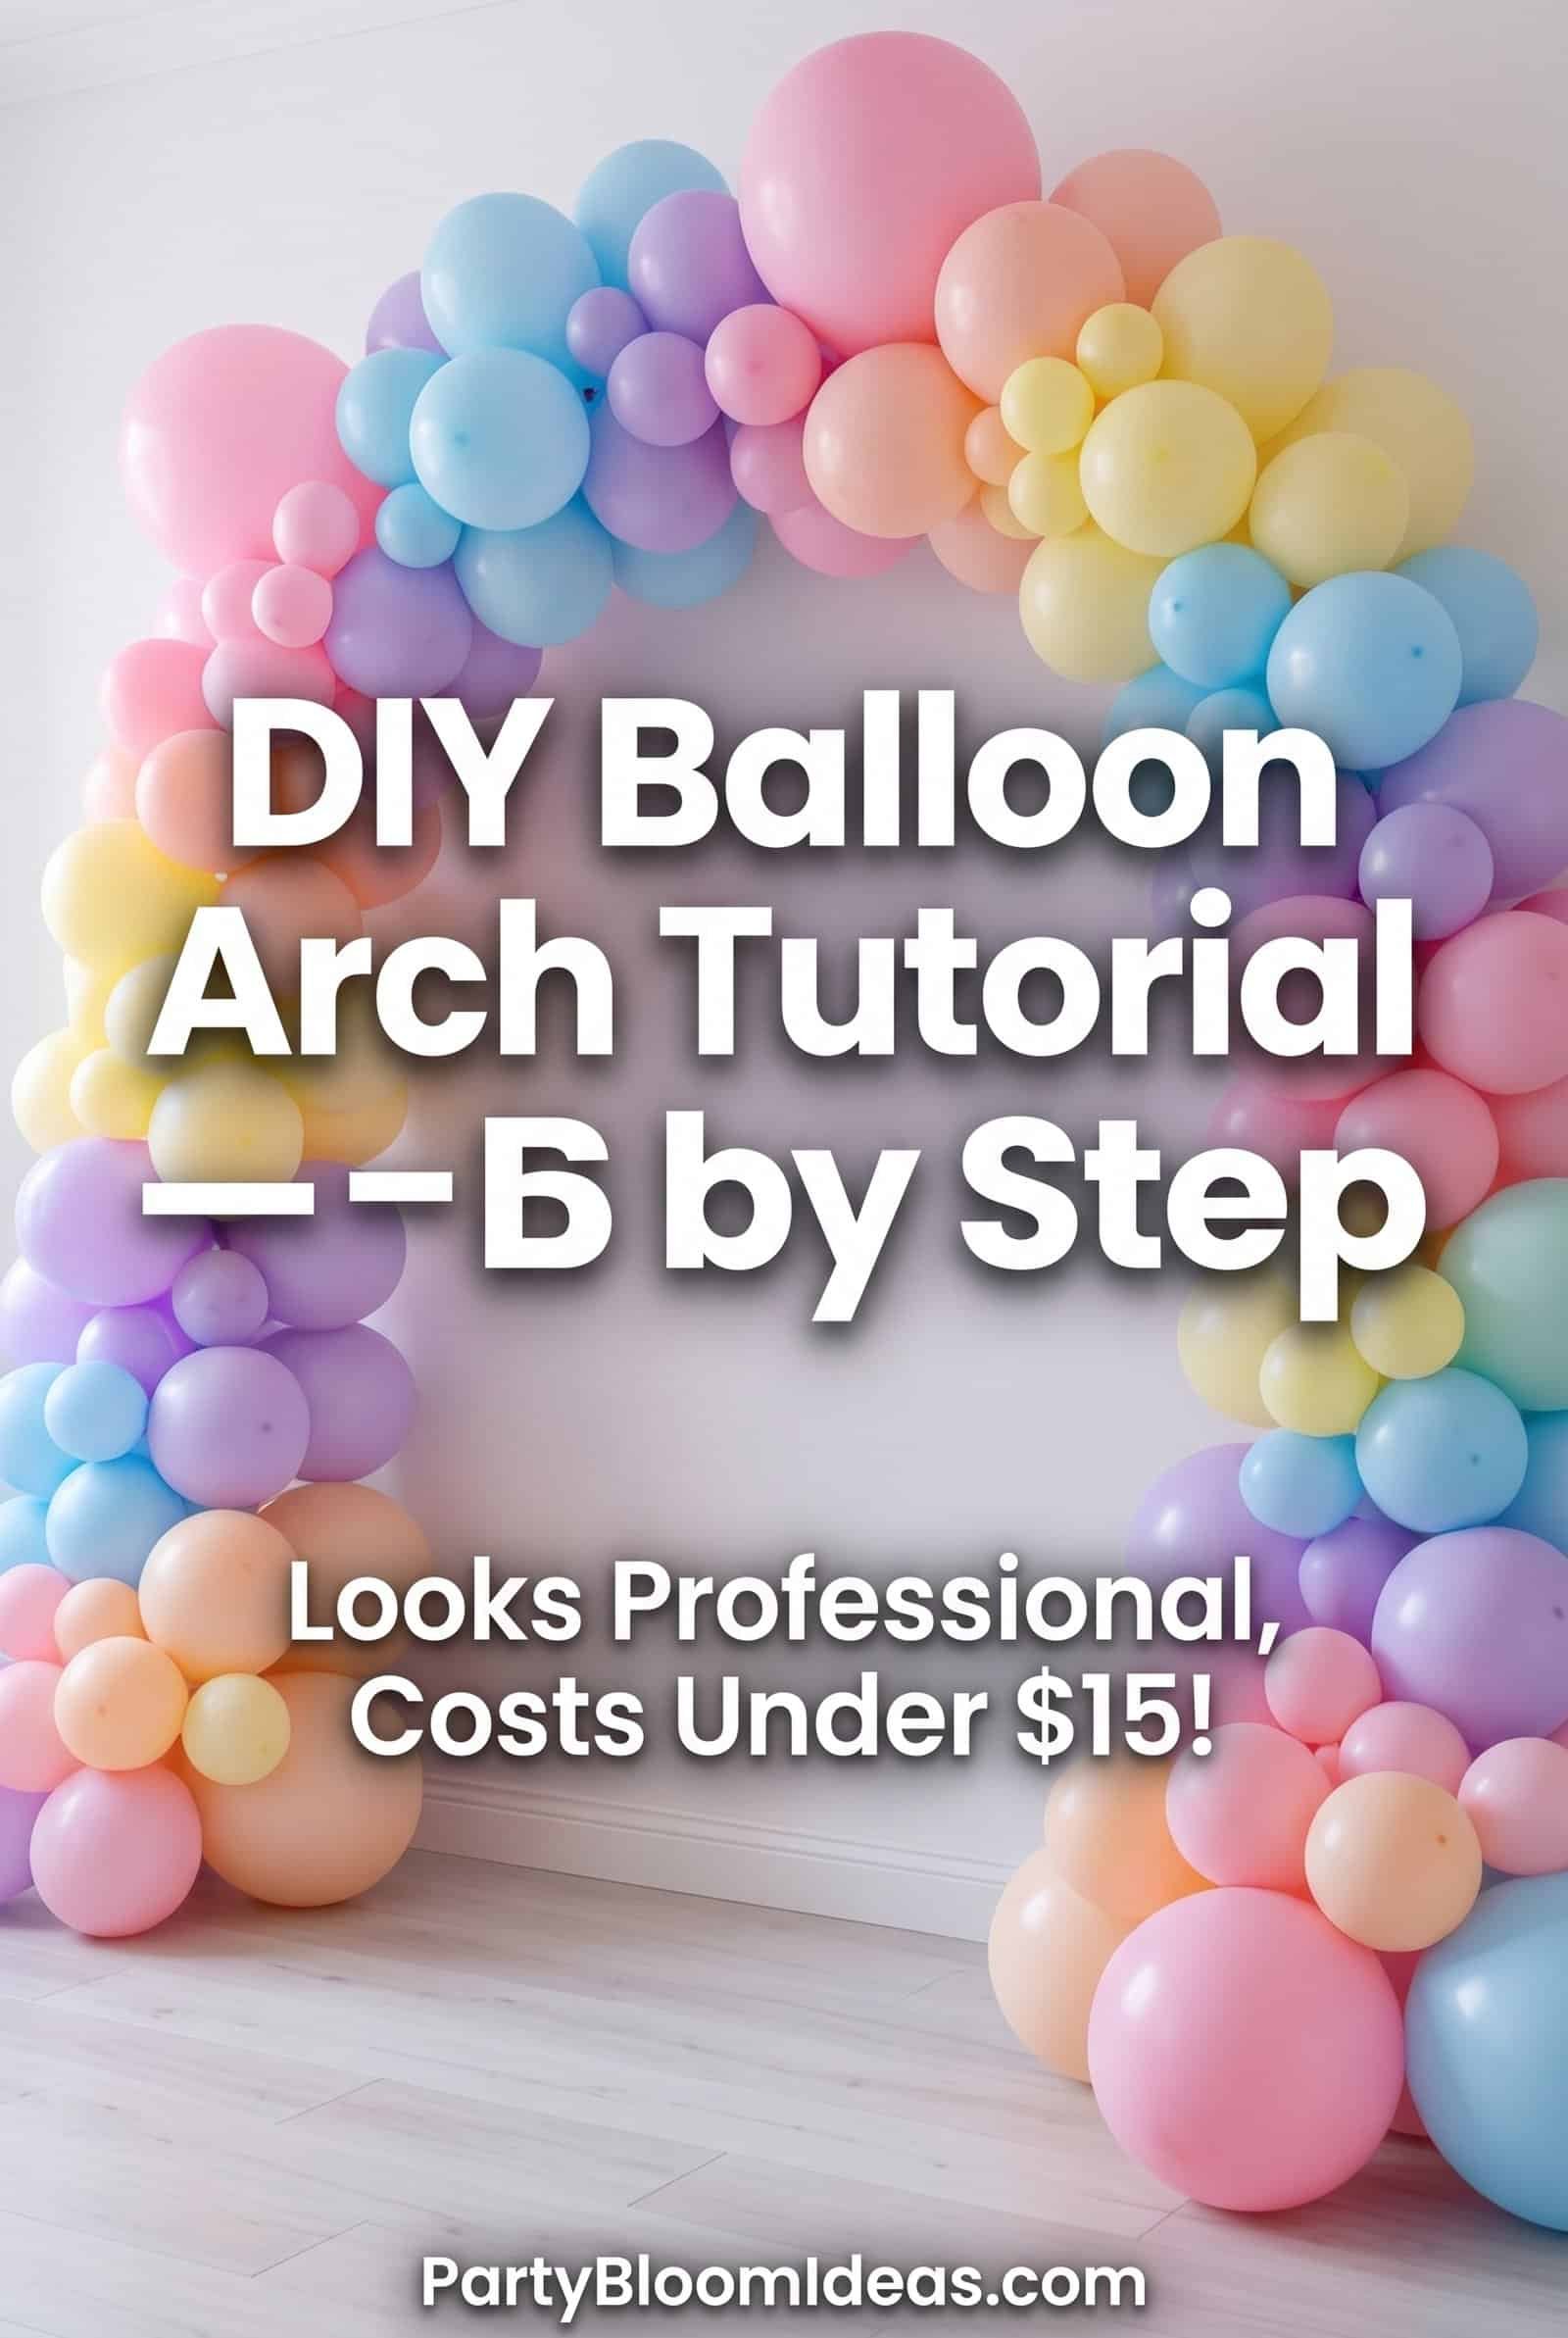
This is the complete guide to making your own balloon arch. Every step is detailed, every common mistake is addressed, and by the end of this, you will have the skill to create a show-stopping party decoration that looks like you hired a professional. You did not. You are the professional now.
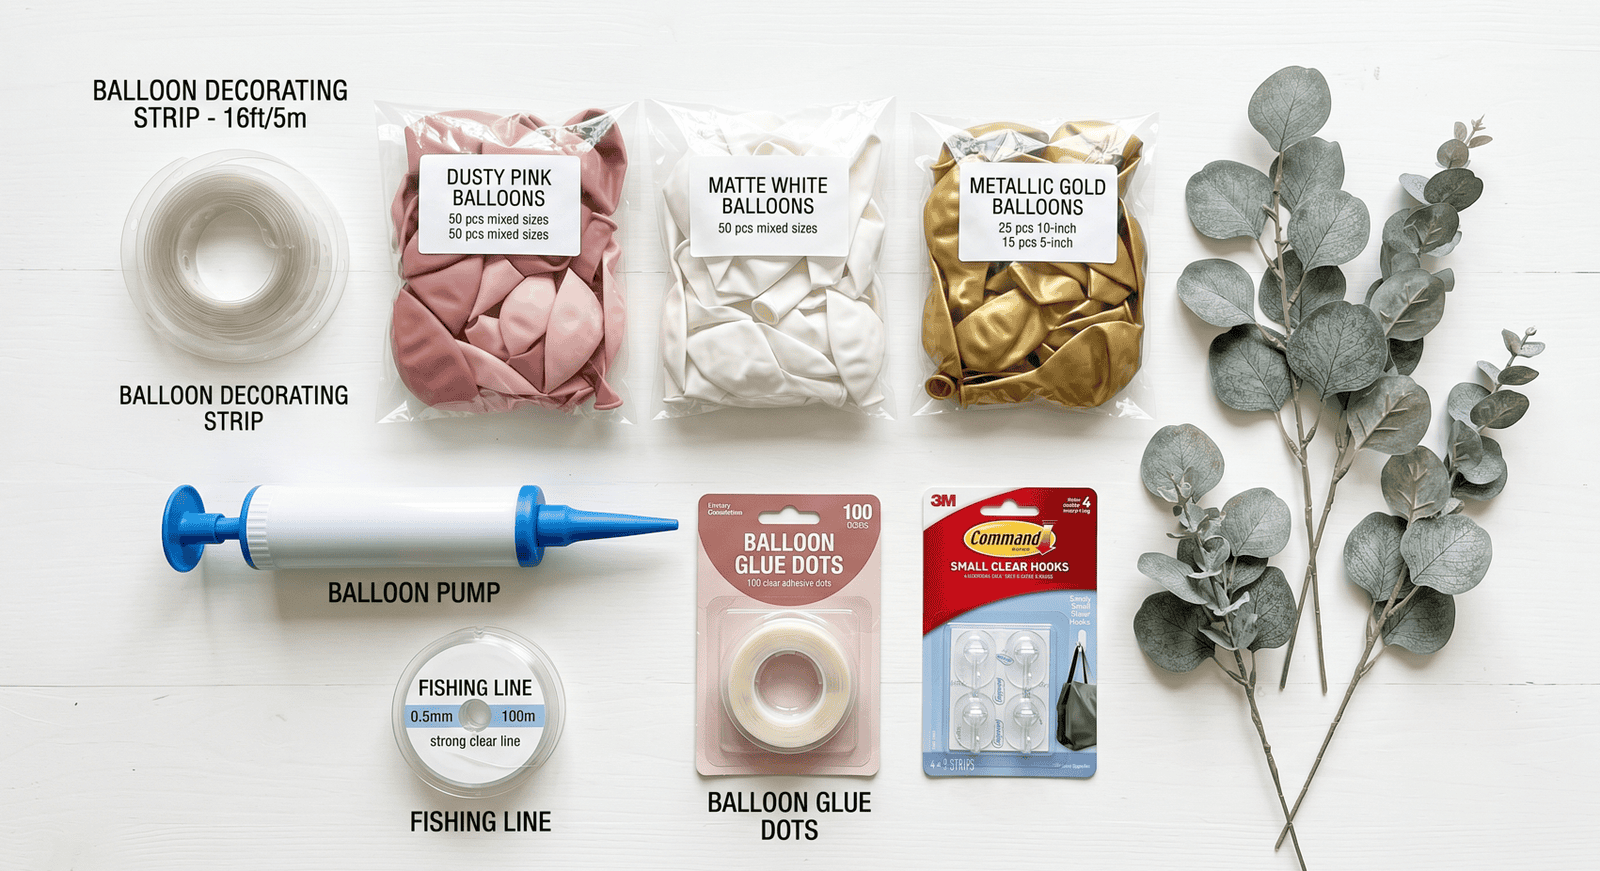
What You Need (Complete Supply List)
Before you start inflating anything, gather all your supplies. Having everything ready before you begin saves time and prevents the frustrating mid-project trip to the store.
Essential supplies:
A balloon arch strip is the backbone of the entire project. This is a long, flexible plastic strip with pre-cut holes that hold inflated balloons in place. You can find them at dollar stores, party supply stores, or Amazon for $2 to $5. Buy a strip that is at least 16 feet long — you can always cut it shorter, but you cannot add length once you start.
Balloons are obviously the main event. You need 80 to 120 balloons for a standard 6 to 8 foot arch. Buy them in three to four coordinating colors and in at least two different sizes — 12-inch standard balloons for the main body and 5-inch mini balloons to fill the gaps. A bag of 50 standard balloons costs $3 to $5 at any party store or dollar store. A bag of 50 mini balloons costs about the same. Your total balloon budget should be $8 to $15 depending on how many colors you want.
A hand balloon pump is essential unless you want to hyperventilate before the party starts. Do not inflate balloons with your mouth — it takes five times longer, it is exhausting, and the balloons deflate faster because of the moisture from your breath. A double-action hand pump (the kind that inflates on both push and pull) costs $3 to $5 and makes the entire process manageable. You can inflate 100 balloons in about 30 minutes with a hand pump.
Helpful but optional supplies:
Balloon glue dots are small adhesive dots that let you attach individual balloons to fill gaps in your arch. A roll of 100 glue dots costs $2 to $3 and they are incredibly useful for creating that lush, professional look where every gap is filled and every angle looks full.
Command hooks or removable adhesive hooks are the best way to mount your arch to a wall without damaging the surface. You need two to four hooks depending on the arch shape. These cost $3 to $5 for a pack.
Fishing line or clear string lets you hang the arch from a ceiling, doorframe, or overhead structure. It is nearly invisible from a distance, which means the arch appears to float.
Artificial greenery or flower sprigs tucked between balloons add a sophisticated, organic touch that elevates the arch from “party decoration” to “event design.” A small bunch of eucalyptus from the dollar store or a few sprigs of baby’s breath cost $3 to $5 and make a dramatic difference.
Total cost for everything: $14 to $30 depending on how many balloons and accessories you buy.
Step 1: Choose Your Color Scheme
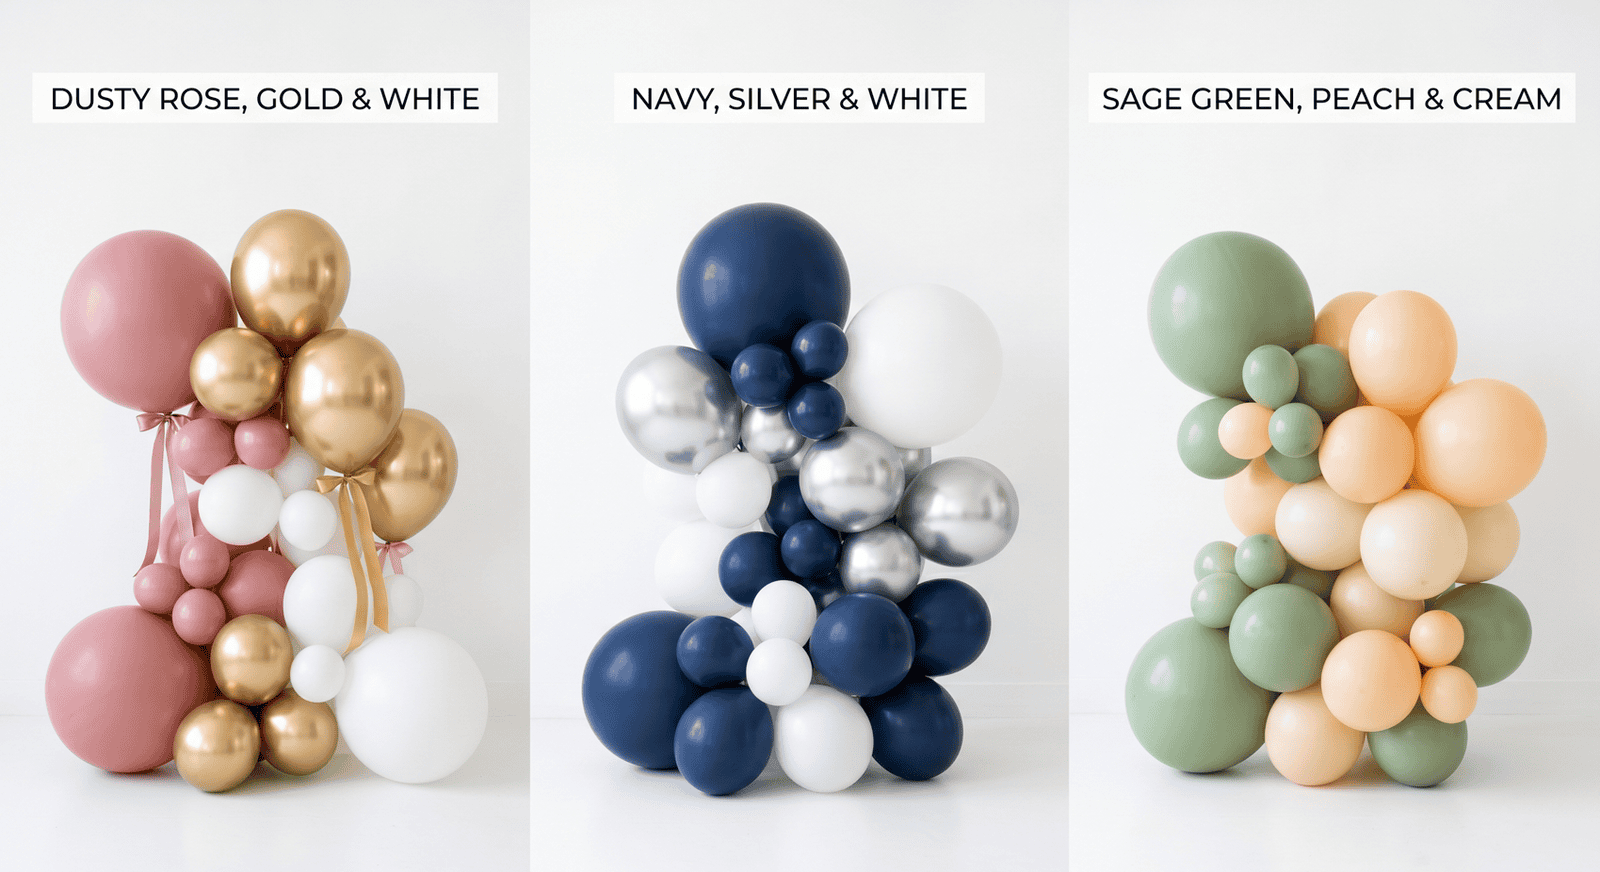
Your color scheme makes or breaks the arch. The right combination looks intentional and sophisticated. The wrong combination looks like a clown’s fever dream. Here is how to choose colors that work.
The safest approach is to pick one main color, one accent color, and white or cream as a neutral. For example, dusty rose as the main color, gold as the accent, and white as the neutral. Or navy as the main, silver as the accent, and white as the neutral. Or sage green as the main, peach as the accent, and cream as the neutral. This three-color formula works for virtually any party theme and always looks cohesive.
If you want a bolder look, use two main colors plus a metallic accent. Coral and teal with gold accents for a tropical theme. Black and orange with silver for Halloween. Red and green with gold for Christmas. Pink and purple with rose gold for a princess party. The metallic balloons — gold, silver, rose gold, or chrome — add shimmer and dimension that make the arch look more expensive than it is.
Avoid using more than four colors unless you are creating a rainbow arch (which has its own rules — use every color of the rainbow in order, not randomly mixed). Too many colors creates visual chaos. Three to four carefully chosen colors creates visual harmony.
Buy roughly 60 percent of your balloons in the main color, 25 percent in the secondary color, and 15 percent in the accent or metallic. This ratio ensures the arch has a dominant color that anchors the design while the other colors add depth and interest without competing.
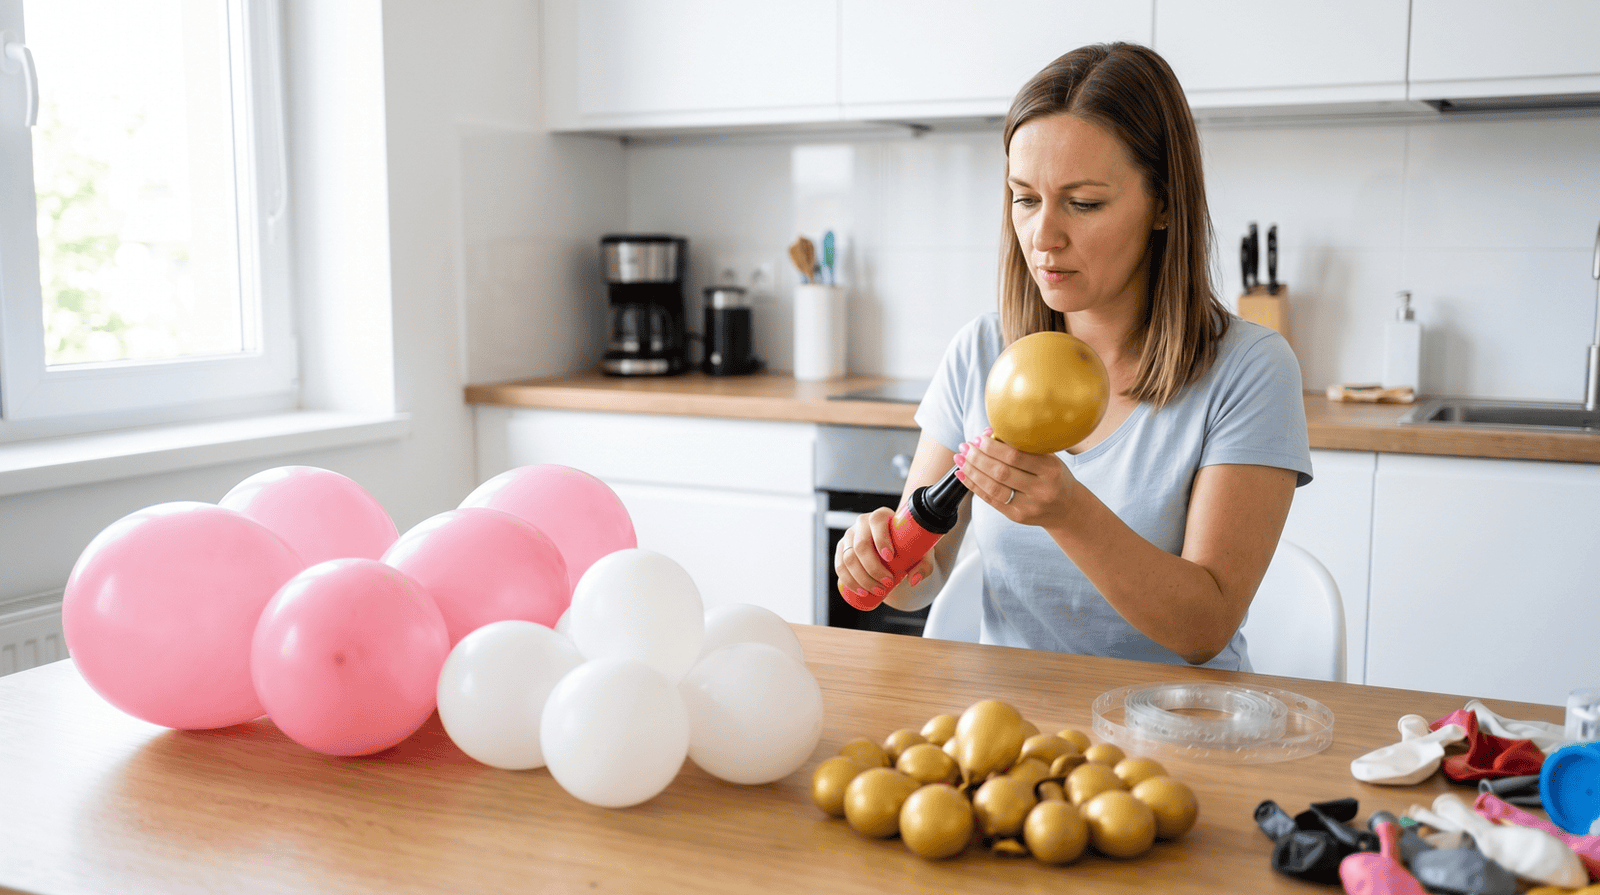
Step 2: Inflate Your Balloons (The Right Way)
This step takes the most time — about 30 to 40 minutes for 100 balloons — but doing it correctly is what separates a professional-looking arch from an amateur one.
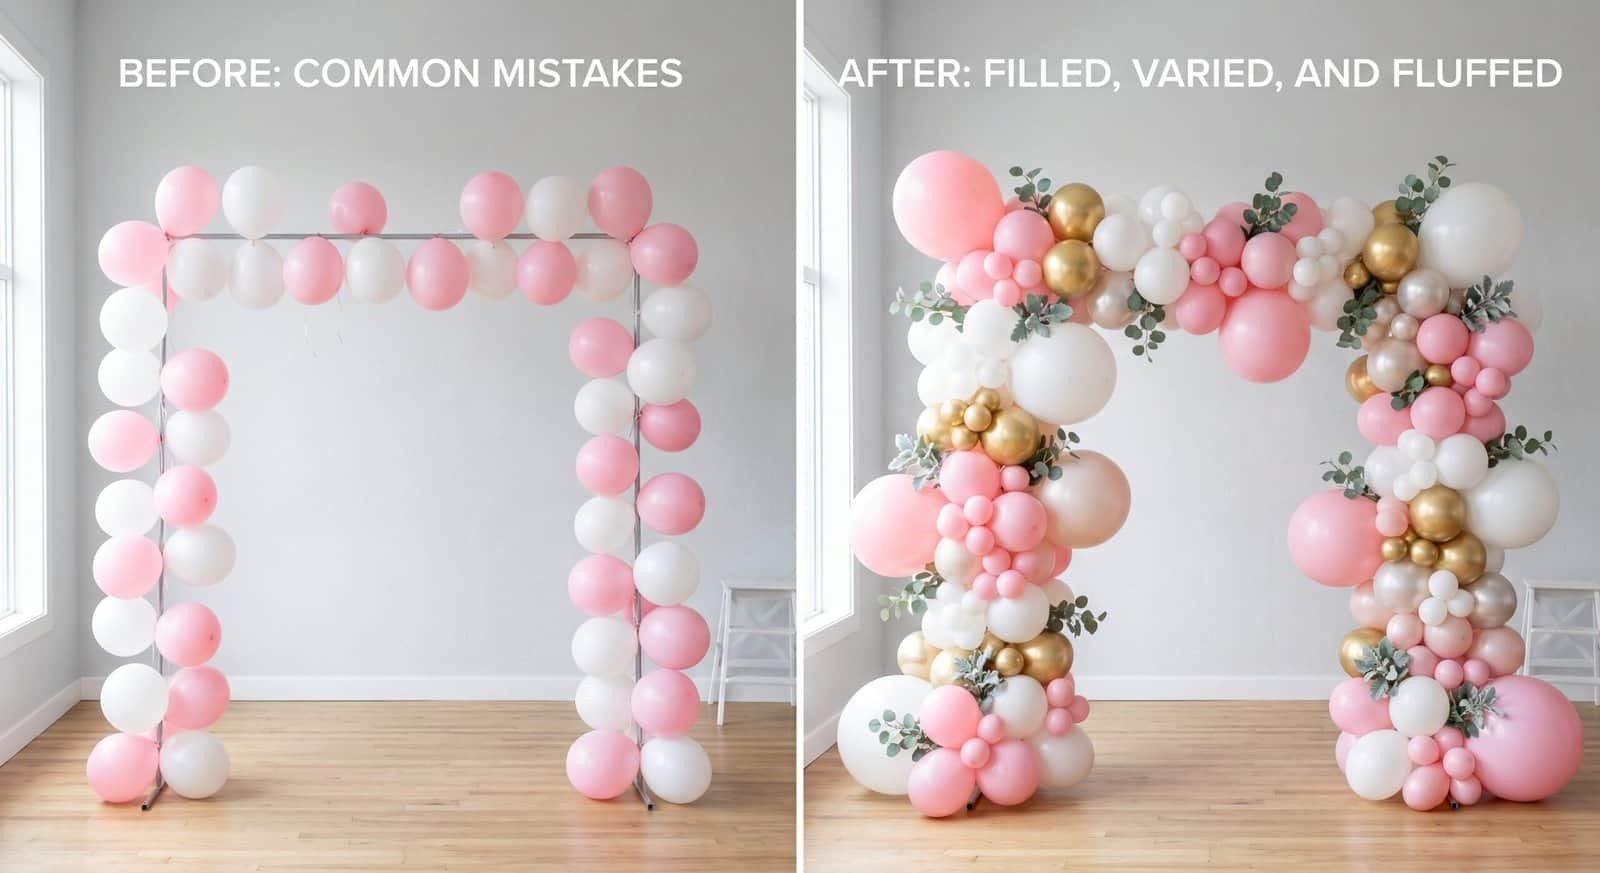
The single most important rule is to inflate your balloons in at least three different sizes. This is the secret that makes organic balloon arches look so lush and full. If every balloon is the same size, the arch looks flat, uniform, and boring — like a giant caterpillar made of identical bubbles. But when you mix large, medium, small, and tiny balloons together, the arch has depth, dimension, and that organic, flowing quality that makes people stop and stare.
Here is the size breakdown. Inflate about 25 percent of your standard 12-inch balloons to full size — these are your large balloons, roughly 11 to 12 inches in diameter. Inflate about 40 percent of your standard balloons to medium size — about 8 to 9 inches in diameter. Use your 5-inch mini balloons as is, inflated to their natural full size — these become your small balloons that tuck into gaps and add fullness.
To get consistent sizes without measuring every balloon, use a simple trick. Inflate the first balloon of each size, hold it against a box or book of the right width, and use that as your visual reference for the rest. A shoe box is roughly 12 inches long — perfect for checking large balloons. A hardcover book is roughly 9 inches — perfect for medium. Once you have inflated five or six of each size, your hands develop the feel and you can gauge by touch alone.
Tie each balloon after inflating and sort them into piles by size. Having three distinct piles — large, medium, and small — makes the assembly step much faster because you can grab the size you need without searching.
Do not inflate balloons more than 12 hours before the party. Latex balloons naturally lose air over time, and balloons inflated the night before will be noticeably smaller and softer by party time. Inflate them the morning of the party, or at most the evening before for an afternoon event. If you must inflate earlier, add a product called Hi-Float inside each balloon before inflating — it coats the inside and keeps balloons full for two to three days.
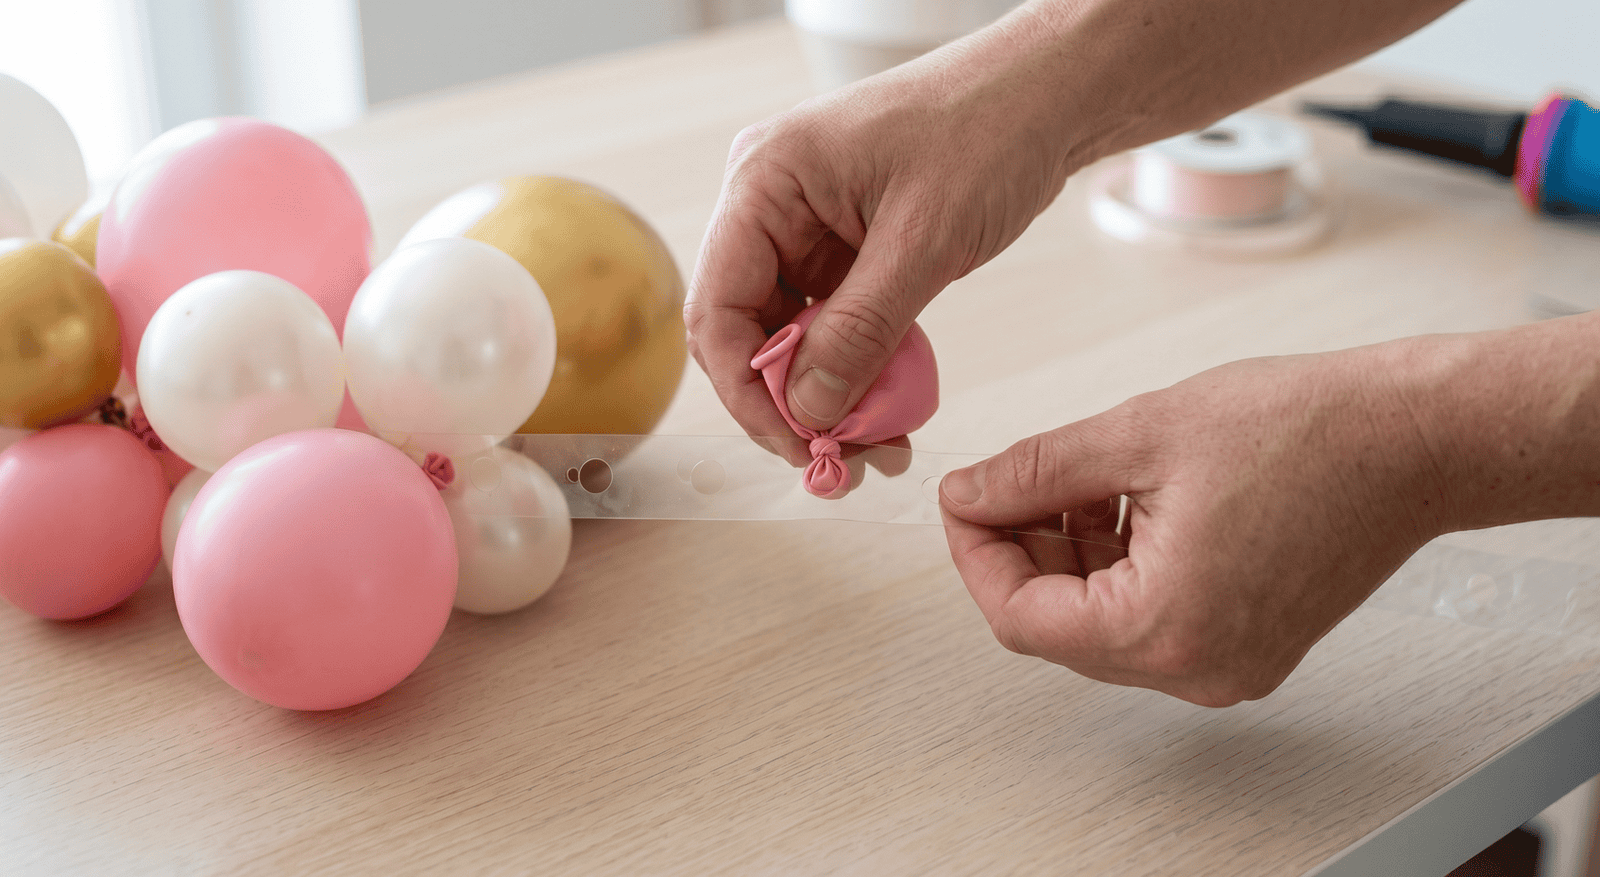
Step 3: Thread Balloons Onto the Arch Strip
This is where the magic starts to happen. Lay your balloon arch strip flat on a large surface — a table, the floor, or a clean section of lawn if you are working outside. You want the full length of the strip accessible so you can work your way from one end to the other without bunching.
Pick up a balloon — start with a large one — and push the knotted end through one of the holes in the strip. The hole stretches to accept the balloon, then grips the knot to hold it in place. Give it a gentle tug to make sure it is secure. Congratulations, you have attached your first balloon. Only 99 more to go.
The pattern for threading is where your arch goes from a string of balloons to a work of art. Do not attach balloons in a straight line using every hole. Instead, skip every other hole and alternate your balloon sizes and colors as you go. A good repeating pattern is: large pink, medium white, large pink, small gold, medium white, large pink, small gold. But honestly, the organic look works best when you are slightly random — the goal is a full, lush garland where no two adjacent balloons are the same size or color.
As you thread, gently twist the strip to rotate where the balloons sit. You want balloons pointing in every direction — up, down, left, right, and everywhere in between — not all sitting on the same side of the strip. This three-dimensional fullness is what makes organic arches look so spectacular. A flat row of balloons looks like a string of beads. A rotated, multi-directional arrangement looks like a cloud of color.
After threading all your standard and medium balloons, you will notice gaps — spaces where the strip or the wall is visible between balloons. This is normal and expected. The gaps get filled in Step 5 with mini balloons and glue dots.
Step 4: Shape Your Arch
Once all your main balloons are threaded onto the strip, it is time to shape the garland into an arch, a swoosh, or whatever form you want. The arch strip is flexible and will hold whatever shape you bend it into.
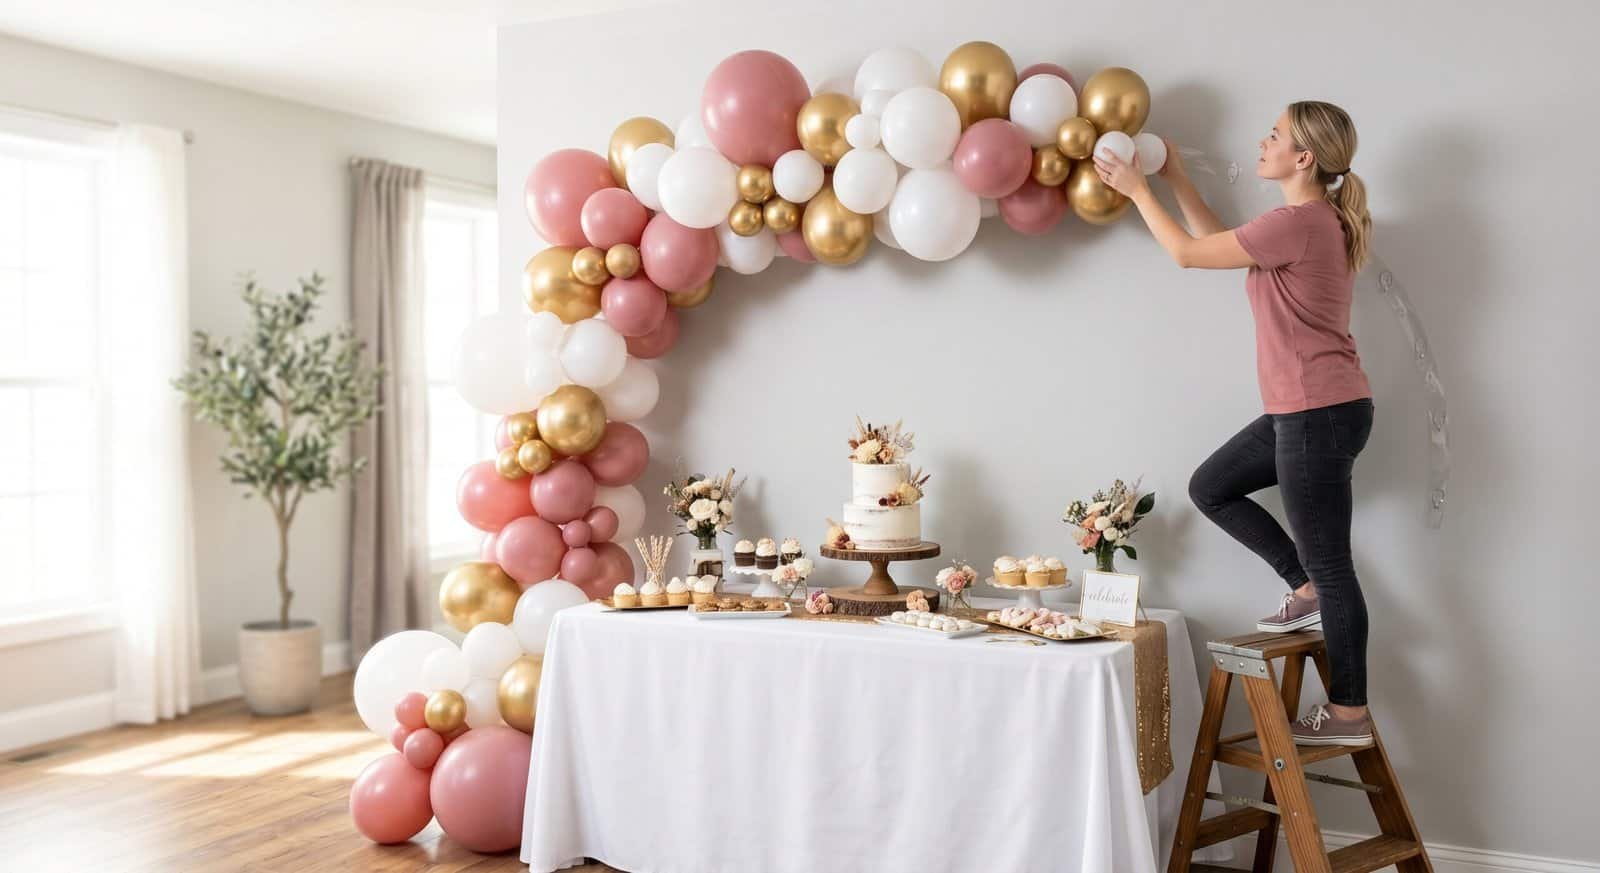
For a classic arch over a table or doorway, you need two anchor points at the top and the garland hanging in a curve between them. Stick two command hooks to the wall at your desired height and width — typically 6 to 7 feet high and 4 to 6 feet apart for a standard arch. Attach each end of the balloon strip to a hook using the built-in holes at the ends of the strip or by tying fishing line from the strip end to the hook.
For a half arch or swoosh (the trendy asymmetrical look), use one anchor point at the top and let the garland cascade down one side. This works beautifully behind a cake table, a photo backdrop, or in the corner of a room. Attach the top end to a hook or command strip high on the wall, and let the bottom end drape down to the floor or onto the table surface.
For a freestanding arch, you need a balloon arch frame — a metal or PVC frame that stands independently without wall mounting. These cost $15 to $30 and are worth the investment if you plan to make arches for multiple events. The frame provides structure while the balloon garland wraps around it.
Once mounted, step back and look at the overall shape. Adjust the curve by gently pulling sections of the strip to redistribute the balloons. If one area looks sparse, push balloons from a fuller section toward the gap. The strip is forgiving — you can reshape it multiple times without damaging anything.
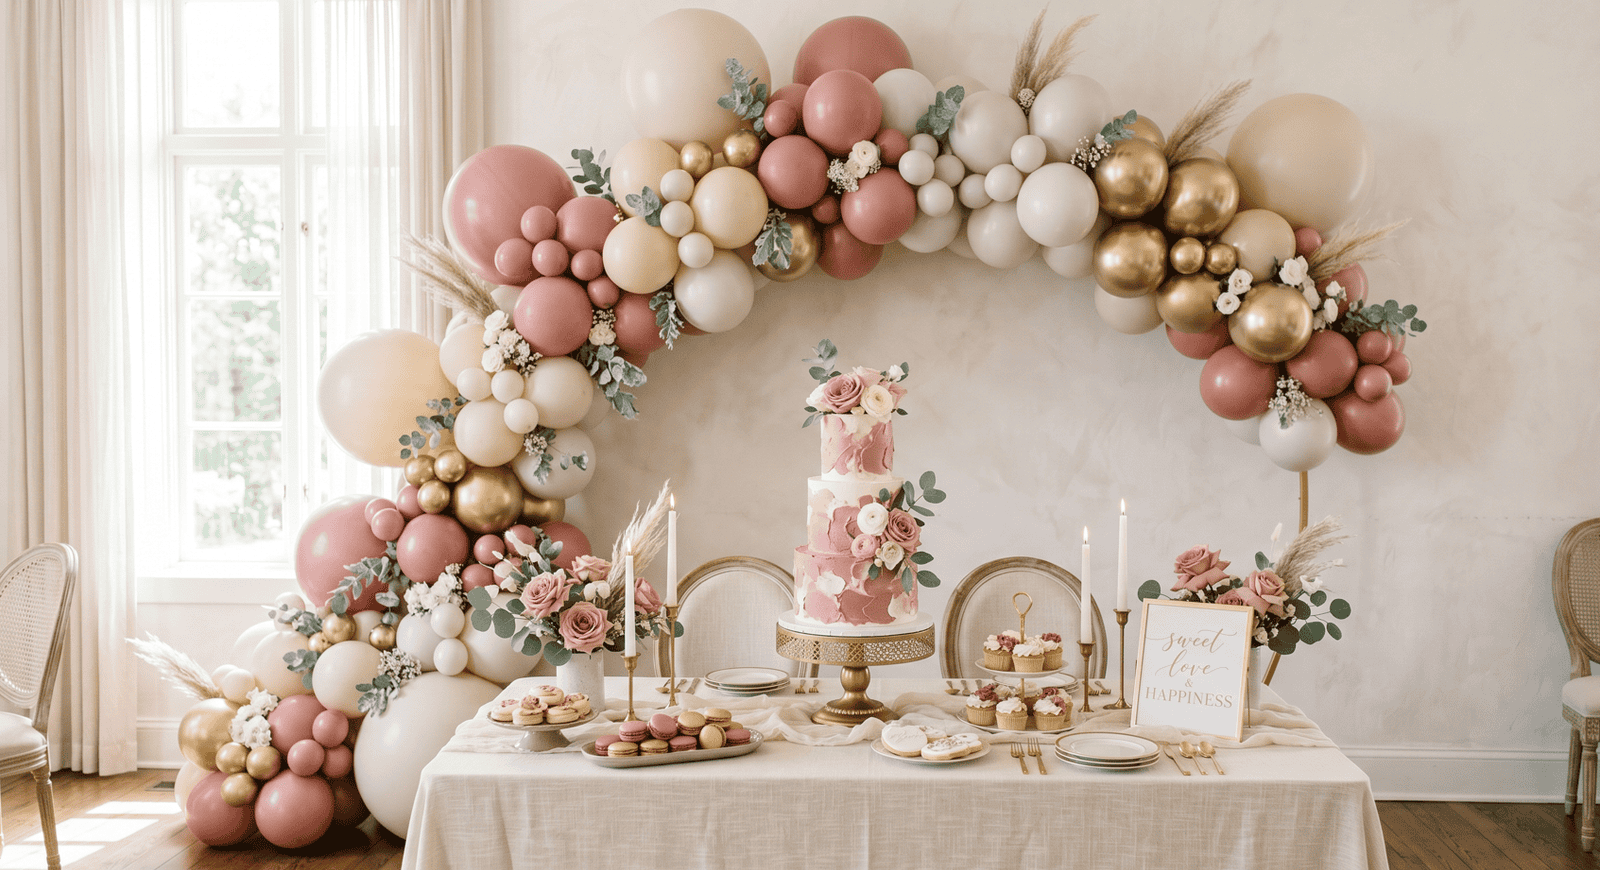
Step 5: Fill the Gaps (The Secret to Professional Results)
This step is what separates a homemade balloon arch from a professional one. After mounting, your arch will have visible gaps where the strip shows through, where the wall peeks between balloons, or where the arrangement looks thin from certain angles. Filling these gaps is what creates that impossibly lush, overflowing look that makes people ask who you hired.
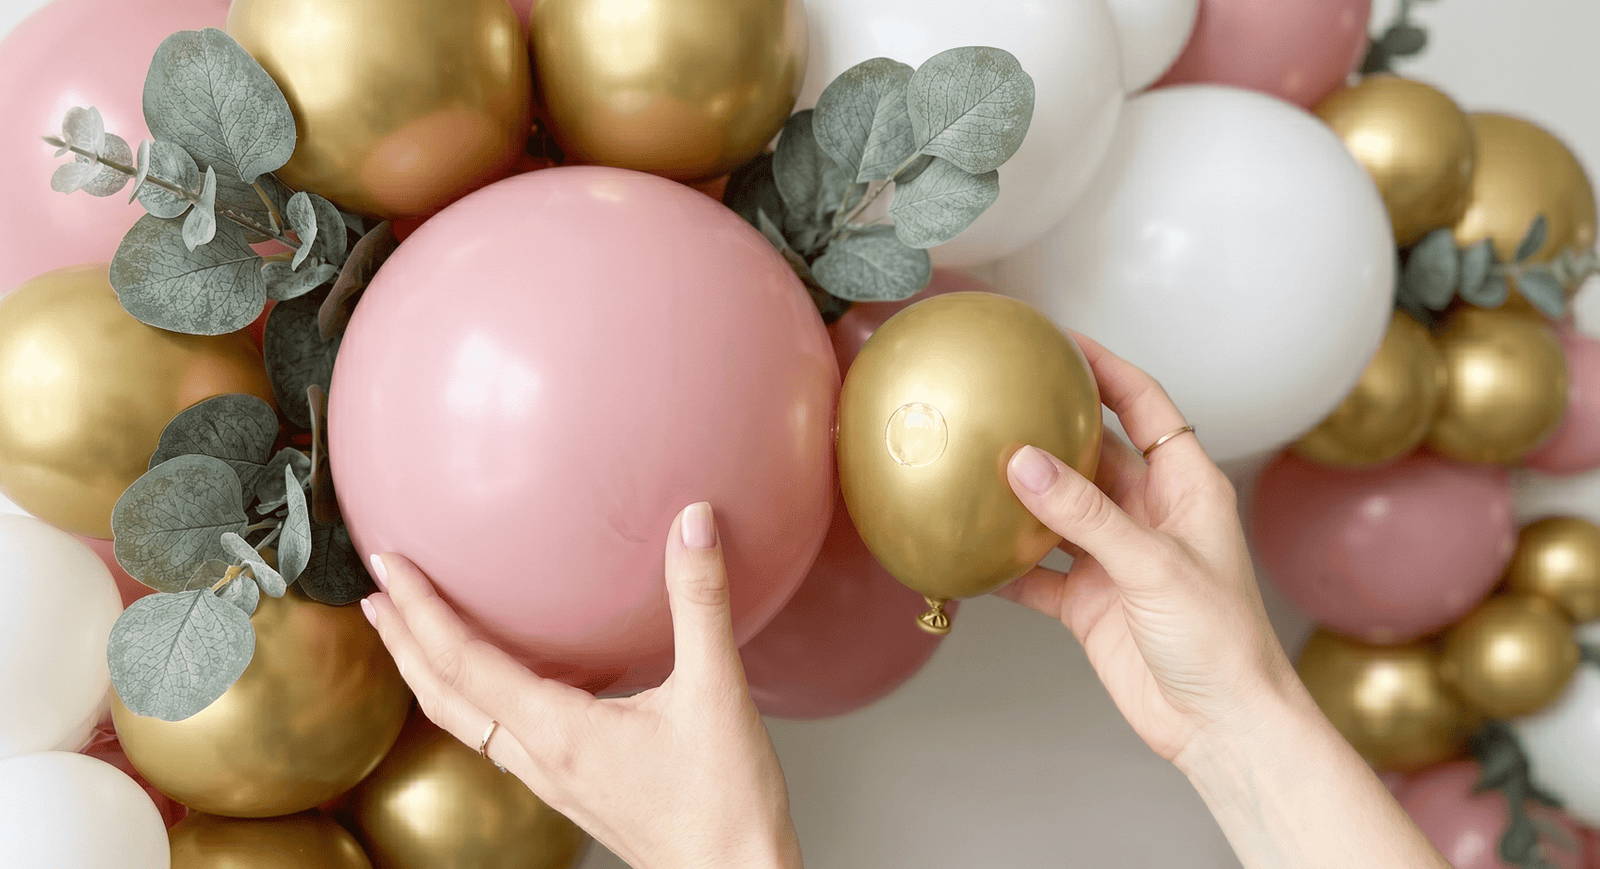
Take your 5-inch mini balloons — you should have 20 to 40 of them in your accent colors and metallics — and attach them to the main arch using balloon glue dots. Place a glue dot on the back of a mini balloon and press it firmly onto a larger balloon in the area where you see a gap. The mini balloon nestles into the space between the larger balloons, filling the gap and adding another layer of dimension.
Work your way around the entire arch, checking from multiple angles — front, sides, and even from below if the arch is overhead. Gaps that are invisible from the front might be obvious from the side, so move around the arch as you fill. Use more mini balloons in areas where the arch changes direction (the top of the curve, where it meets the wall) because these transition points tend to have the most visible gaps.
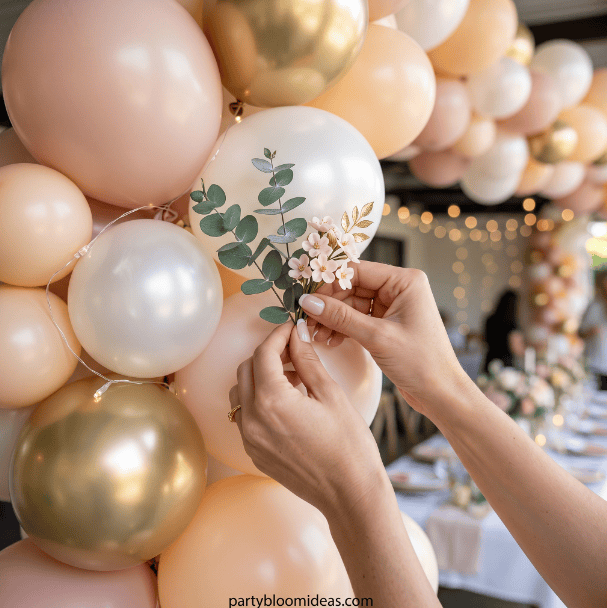
This is also when you add artificial greenery if you are using it. Tuck eucalyptus sprigs, ivy trails, or baby’s breath between balloons using glue dots or by wedging stems into the gaps between the strip and the balloon knots. The greenery adds a natural, organic element that makes the entire arch look more sophisticated and polished. Even three or four small sprigs placed strategically around the arch elevate the design dramatically.
After gap-filling, take a final walk around the arch and fluff. Gently push and rotate individual balloons to adjust their position, fill any remaining thin spots, and ensure the overall shape is balanced and full. This final fluffing takes five minutes and makes a noticeable difference in the finished result.
Step 6: Final Touches and Styling
Your arch is built, shaped, and filled. Now it is time for the finishing touches that turn a great decoration into an unforgettable one.
Consider what is happening around and beneath the arch, because the arch does not exist in isolation — it is part of a larger scene. If the arch is over a dessert table, style the table to complement the balloon colors. Use plates, napkins, and tablecloths that coordinate with your color scheme. Add a cake or cupcake display at the center directly beneath the highest point of the arch. Scatter a few loose balloons on the table surface or on the floor at the base of the arch for a “just happened” organic feel.
If the arch is a photo backdrop, leave space for people to stand in front of it and make sure the lighting in that spot is good. Natural window light or a ring light positioned nearby ensures photos taken at the arch look flattering. Test the photo spot yourself — take a selfie in front of the arch and check that the balloons frame the face nicely without being too close or too far.
Add a few large balloons at the floor level near the base of the arch — these ground the design and create a flowing-from-the-ceiling-to-the-floor effect. If you have leftover balloons, scatter a few on the ground around the party space. These floor balloons are a small detail that makes the entire room feel cohesive and celebratory rather than having one decorated spot in an otherwise plain room.
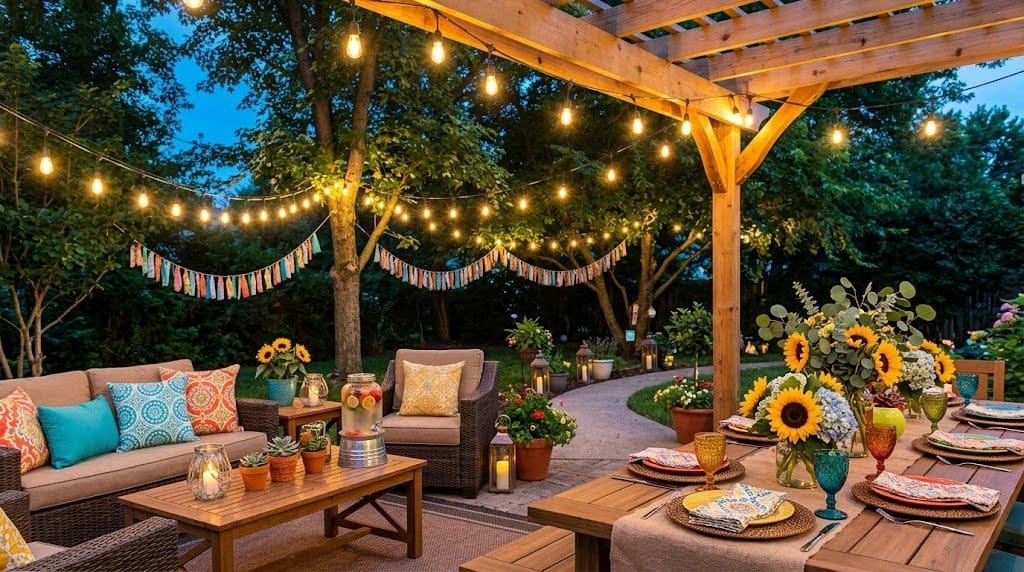
Balloon Arch Ideas for Different Occasions
The technique above works for any party. Here are color and style ideas for specific celebrations.
Birthday Party Arch
Go with the birthday person’s favorite colors plus gold or silver metallic accents. A “Happy Birthday” banner or garland hung in the center of the arch adds a personalized focal point. For milestone birthdays (1st, 16th, 21st, 30th, 50th), add a large metallic number balloon at the peak of the arch.
Baby Shower Arch
Classic pastel combinations work beautifully: soft blue, white, and silver for a boy. Blush pink, white, and gold for a girl. Mint green, yellow, and white for gender-neutral. Add small baby-themed props at the base — a pair of tiny shoes, a stuffed animal, a small plant that grows with the baby.
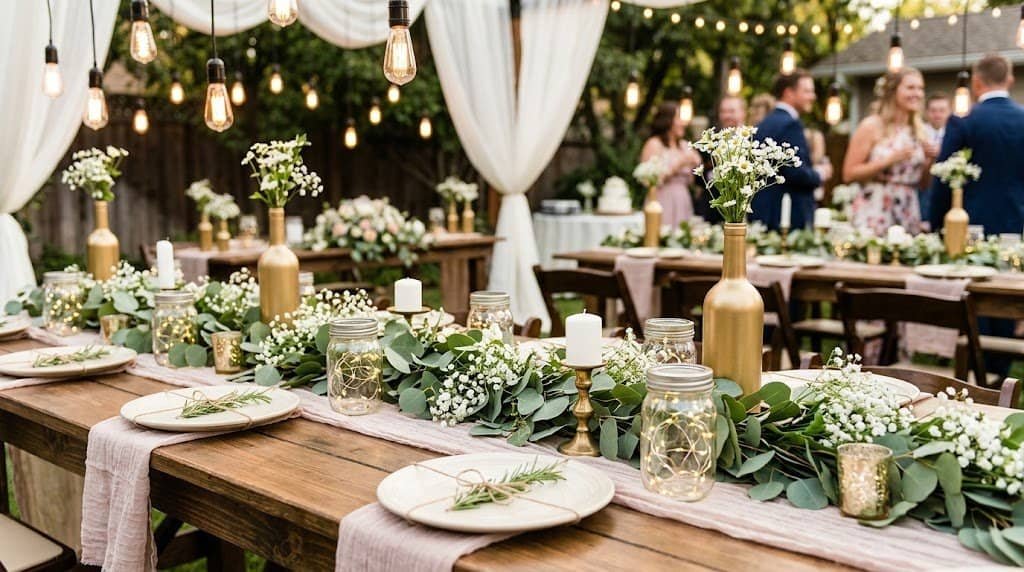
Wedding or Engagement Arch
White, cream, gold, and clear balloons create an elegant, romantic arch. Add more greenery than you would for a casual party — drape eucalyptus garlands along the bottom edge and tuck roses or peonies (real or faux) between balloons. This creates a hybrid floral-balloon arch that photographs beautifully and frames the couple or the cake table.
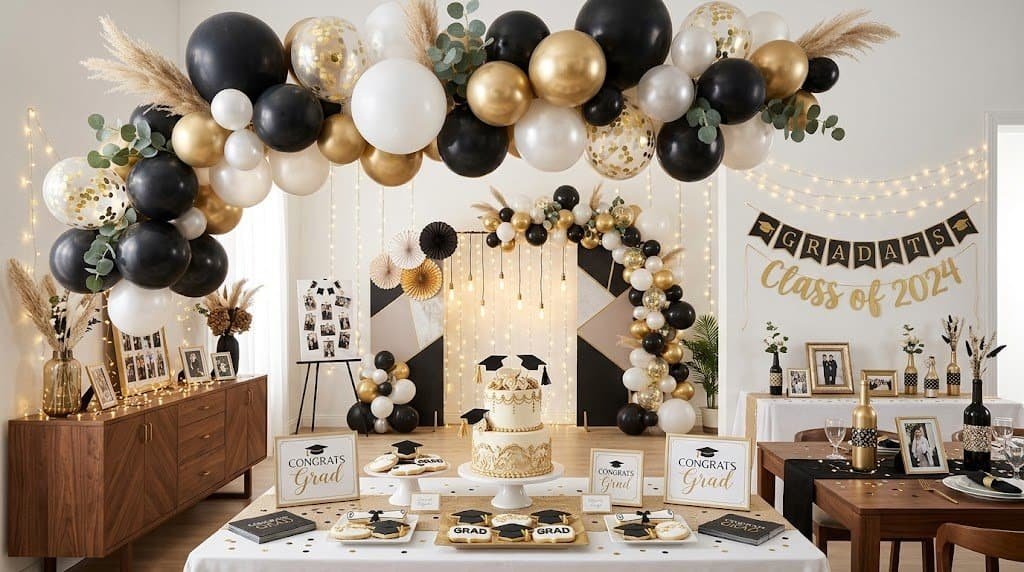
Graduation Arch
Use the school’s colors plus metallic gold or silver. Attach a “Congrats Grad” banner across the center of the arch. Add tissue paper tassels in school colors hanging from the bottom edge. This arch becomes the must-photograph spot at the graduation party.
Holiday Arch
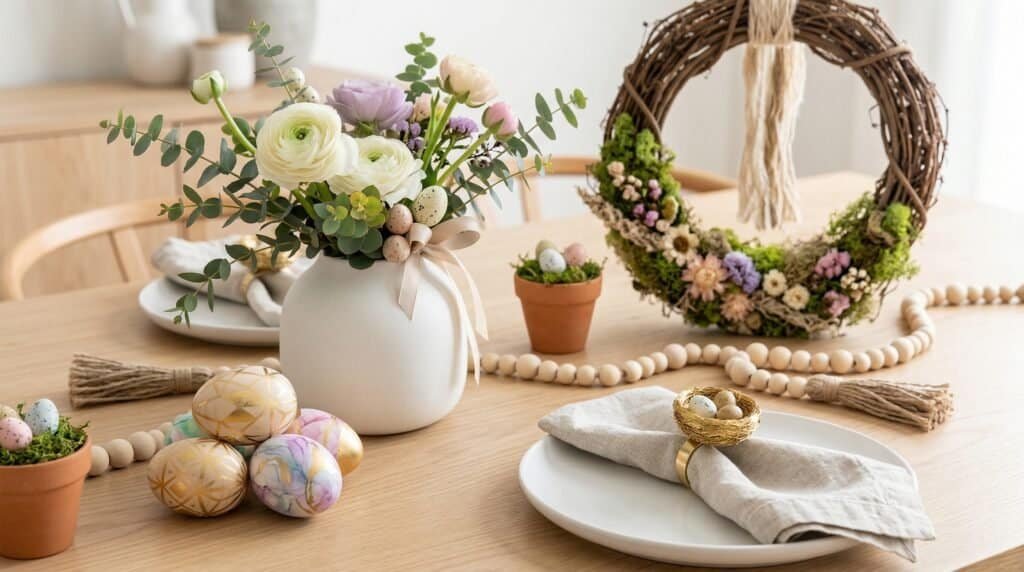
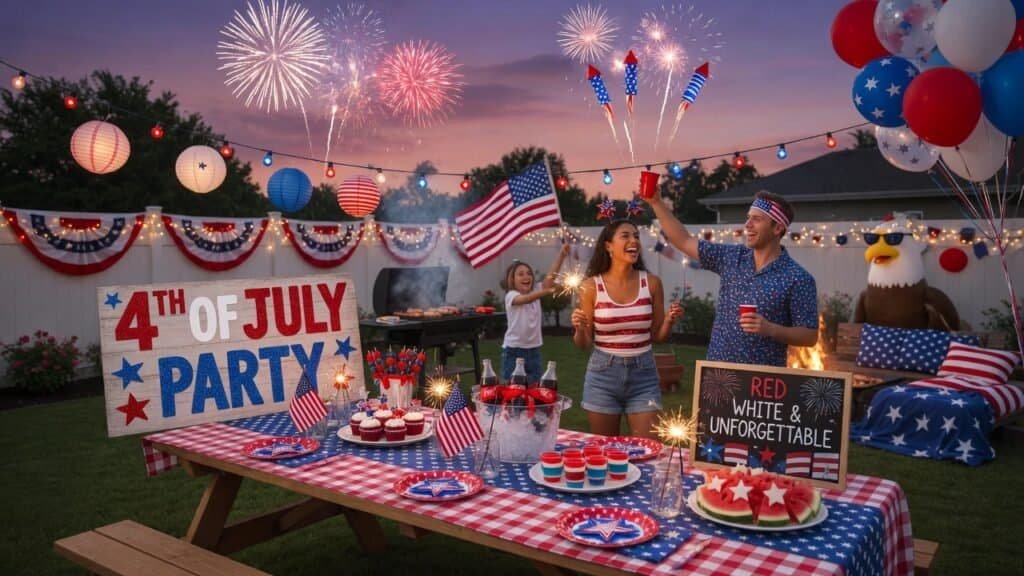
Red, green, and gold for Christmas. Orange, black, and purple for Halloween. Red, white, and blue for 4th of July. Pastels and white for Easter. The balloon arch technique works for literally any holiday — you just change the colors and the arch transforms to match the occasion.
Troubleshooting Common Problems
My balloons keep popping during inflation
You are either overinflating or the balloons are low quality. Stretch each balloon gently two or three times before inflating to warm up the latex. Inflate to about 80 percent of the balloon’s maximum size rather than full capacity. If balloons are popping frequently, the batch may be old or defective — try a different brand.
My arch looks flat and boring
You are not varying balloon sizes enough. The most common mistake is inflating all balloons to the same size. Go back and add 20 to 30 mini balloons in the gaps using glue dots. Also make sure you twisted the strip while threading so balloons point in multiple directions, not all the same way.
The arch keeps falling off the wall
Your command hooks might not be rated for the weight. A full balloon arch can weigh 5 to 10 pounds. Use heavy-duty command hooks rated for at least 5 pounds each. Apply them to a clean, dry wall surface and wait one hour before hanging the arch. For very heavy arches, use four hooks instead of two and distribute the weight along the length.
The colors look weird together
Some color combinations that look great in your head do not work in reality because the shades clash. Before building the full arch, inflate five balloons of each color and hold them together to see how they look. If a color feels off, swap it out before committing 30 balloons to it. When in doubt, add more white — white is the universal harmonizer that makes every other color look better beside it.
My arch looks nothing like the Pinterest picture
Pinterest images are often taken by professional photographers with perfect lighting and extensive editing. Your arch probably looks better than you think — try photographing it from different angles and in natural light rather than overhead room lighting. The camera angle that works best is slightly below the arch, looking up, which emphasizes the fullness and creates that dramatic wow effect.
Frequently Asked Questions
How long does it take to make a balloon arch?
For a first-timer, expect about 90 minutes to two hours total: 30 to 40 minutes for inflating, 20 to 30 minutes for threading onto the strip, 10 to 15 minutes for mounting, and 15 to 20 minutes for gap-filling and finishing. With practice, you can complete an arch in about 60 to 75 minutes. The process gets significantly faster after your second or third arch.
How many balloons do I need?
A standard 6 to 8 foot arch requires 80 to 120 balloons including mini balloons for gap-filling. A larger 10 to 12 foot arch needs 150 to 200 balloons. A small tabletop swoosh or half-arch uses 40 to 60 balloons. It is always better to buy more balloons than you think you need — leftover balloons cost pennies and running out mid-project is frustrating.
How far in advance can I make a balloon arch?
Latex balloons stay full for 12 to 18 hours without treatment. With Hi-Float spray inside the balloons, they last two to three days. For best results, build your arch the morning of the event. If that is not possible, build it the evening before — it will still look great the next afternoon.
Can I make a balloon arch without a strip?
Yes, but it is much harder. The traditional method involves tying pairs of balloons together, then twisting pairs around each other to form clusters of four, then connecting the clusters. This method works but takes twice as long, is harder to shape, and creates a more uniform look. The strip method is easier, faster, and produces a more organic result. The strip is worth the $2 to $5 investment.
What is the cheapest way to make a balloon arch?
Buy balloons and a strip from the dollar store. A bag of 50 balloons is $1.25 at Dollar Tree, and they carry arch strips for $1.25 as well. Two bags of balloons and one strip give you everything you need for $3.75 plus a hand pump ($1.25). Total: $5 for a complete, beautiful balloon arch that looks like it cost $100.
Can I make a balloon arch outdoors?
Yes, but with some precautions. Wind is the enemy — even a moderate breeze will push and distort an arch. Weight the base of a freestanding arch with sandbags or bricks. Avoid direct afternoon sun, which can cause balloons to pop from heat expansion. Outdoor arches work best on calm days in shaded or partially shaded areas. Build the arch as close to party time as possible to minimize sun and wind exposure.
You Made That. Yes, You.
The first time someone walks into your party, sees your balloon arch, and says “oh my God, that is gorgeous” — and you get to say “I made it myself” — something shifts. You realize that the gap between what professionals charge and what you can do yourself is not skill. It is knowledge. And now you have the knowledge.
This technique works for every party, every holiday, every celebration for the rest of your life. The colors change. The sizes change. The shape changes. But the skill stays with you forever. And every arch you make gets faster, easier, and more beautiful than the last.
So buy the balloons. Get the strip. Pump up the hand pump. And make something that makes a room feel like a celebration the moment people walk in.
Your hands. Your creation. Your party. And it only cost $14.
Pin this tutorial for your next party and share it with every friend who has a celebration coming up. Visit PartyBloomIdeas.com for more DIY party ideas that look expensive but aren’t!
Related articles:
- The Ultimate Guide to Planning a Birthday Party on a Budget
- 30 Best Summer Party Ideas for the Ultimate Backyard Bash
- 15 Creative DIY Easter Decorations That Wow Your Guests
- 20 Mothers Day Party Ideas She Will Never Forget
Read More : 14 Mother’s Day Party Ideas (2026) Sunday, May 10, 2026