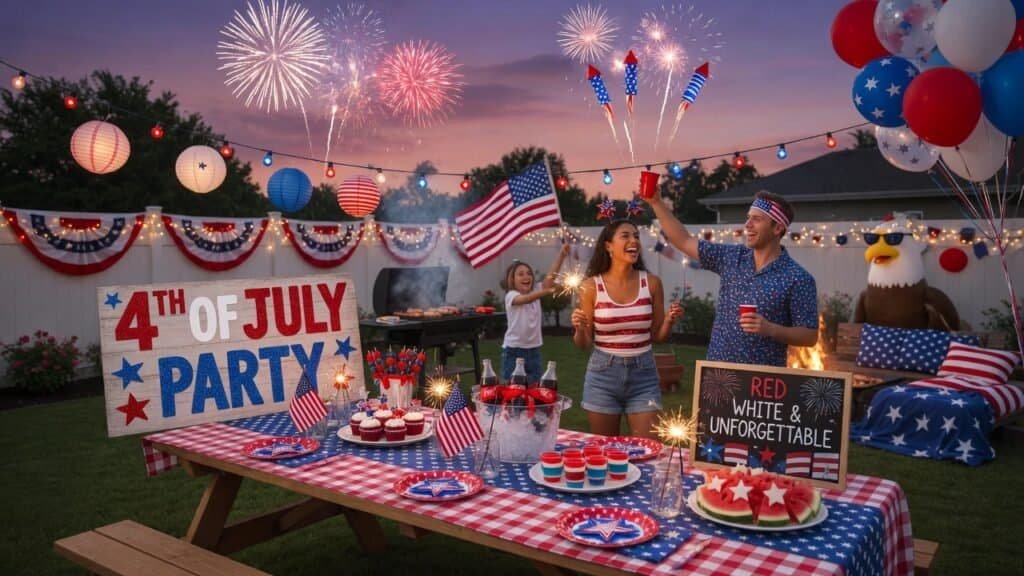
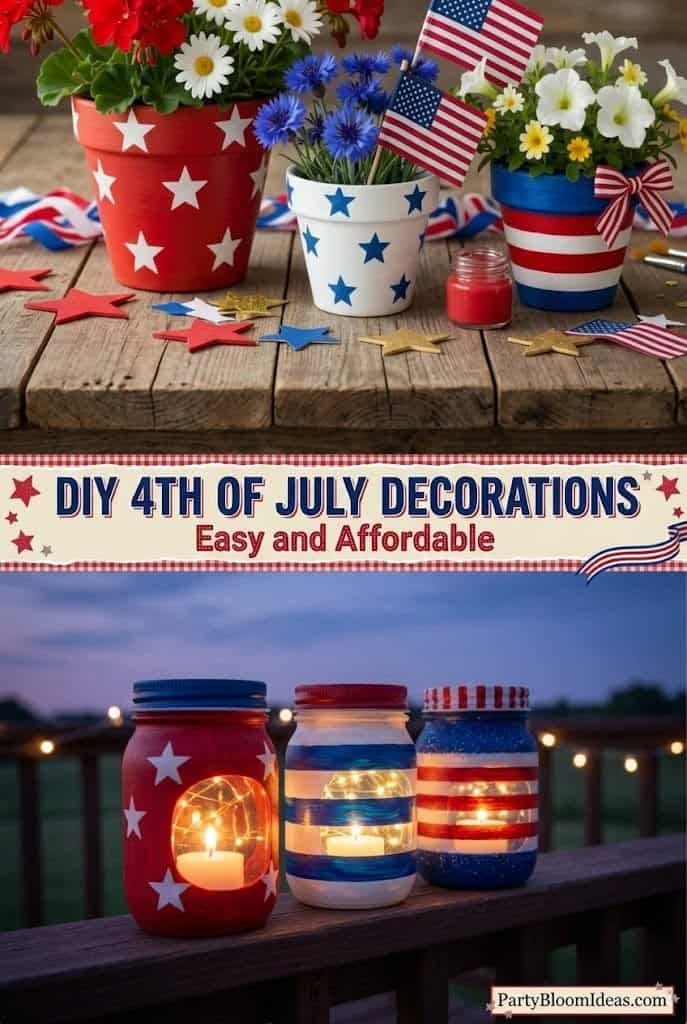
DIY 4th of July Decorations are honestly the only reason my house ever looks patriotic on time anymore.
Every year I have one friend who says, “Wait, is the 4th this week?” around June 28th. And honestly… that friend is usually me.
The first time I hosted a 4th of July party, I realized on July 2nd that my house looked exactly like any normal summer day—no red, white, and blue, no festive vibe, nothing that said Independence Day was coming. I had just four days left, and by then, Target was already picked clean of decent decorations. All the good stuff was gone.
So I did what I had to do—I went to Dollar Tree, dug through my craft closet, and got creative.
That last-minute emergency turned into a tradition. Now I make most of my DIY 4th of July decorations every year because they honestly look better than store-bought ones and cost a fraction of the price.
Here are 20 DIY 4th of July decoration ideas that actually work. Most take under 30 minutes, most cost under $15, and all of them look way better in real life than they do in pictures.
What You’ll Actually Need (Supply Shopping List)
Before we dive in, here is the basic craft supply list. Most of this you either own or can buy for under $25 at Dollar Tree, Walmart, or a craft store:
- Acrylic paint in red, white, and blue
- Painter’s tape or masking tape
- Twine or rustic rope
- Mason jars (save them from grocery items throughout the year)
- White paper plates
- Red, white, and blue construction paper or cardstock
- Tissue paper in red, white, and blue
- Wooden skewers or dowels
- Hot glue gun
- Scissors
- Small American flag picks from Dollar Tree
With this basic kit, you can make almost every project in this article. Most projects use only 2 or 3 items from this list.
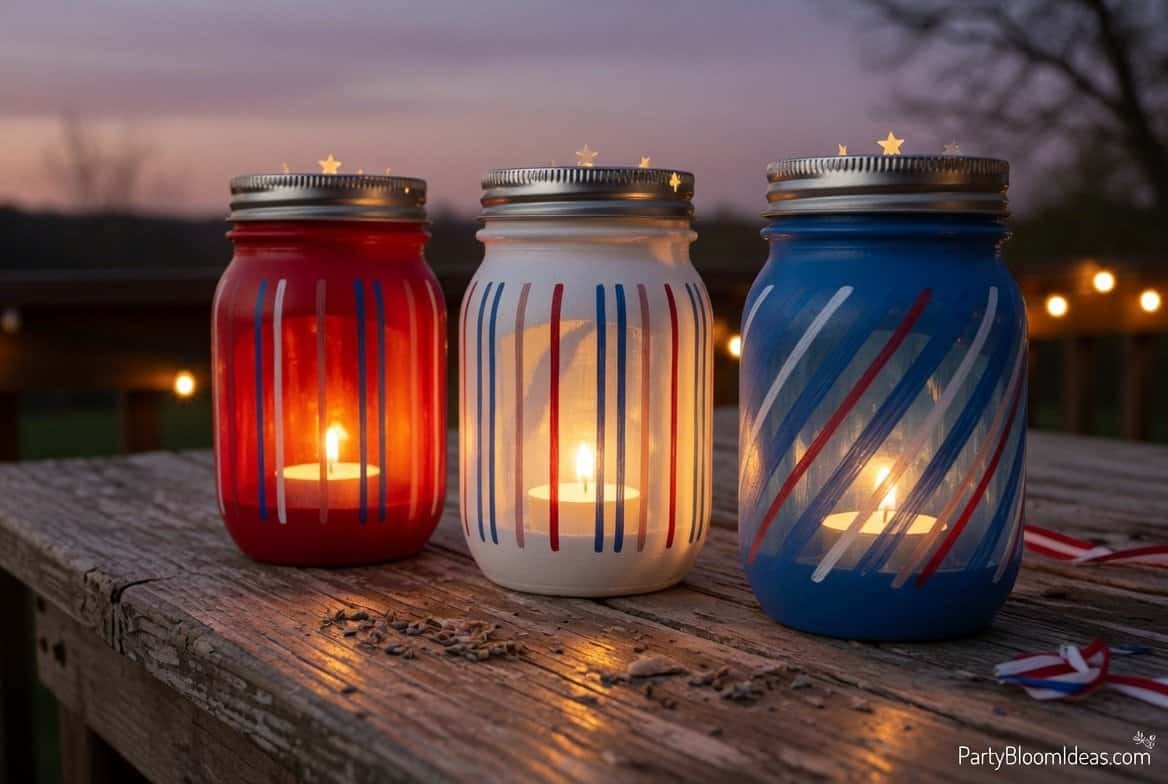
1. Painted Mason Jar Lanterns (15 Minutes Each)
The centerpiece star of any 4th of July table. Takes 15 minutes per jar, looks amazing.
Supplies:
- 3 clean mason jars (save from spaghetti sauce or pickle jars if you don’t want to buy)
- Red, white, and blue acrylic paint
- Painter’s tape
- Tea lights or LED candles
Here is how:
- Clean and dry the mason jars completely
- Use painter’s tape to create stripes on the outside of the jars
- Paint one jar red, one white, one blue — let them dry
- Peel off the tape to reveal stripes
- Drop a tea light (battery-operated for safety) inside
Set them in a row on your food table or on a porch step at night. When the LED candles glow, the painted stripes light up beautifully.
Total cost for 3 jars: $0 if you already saved jars, otherwise about $5 for a 3-pack.
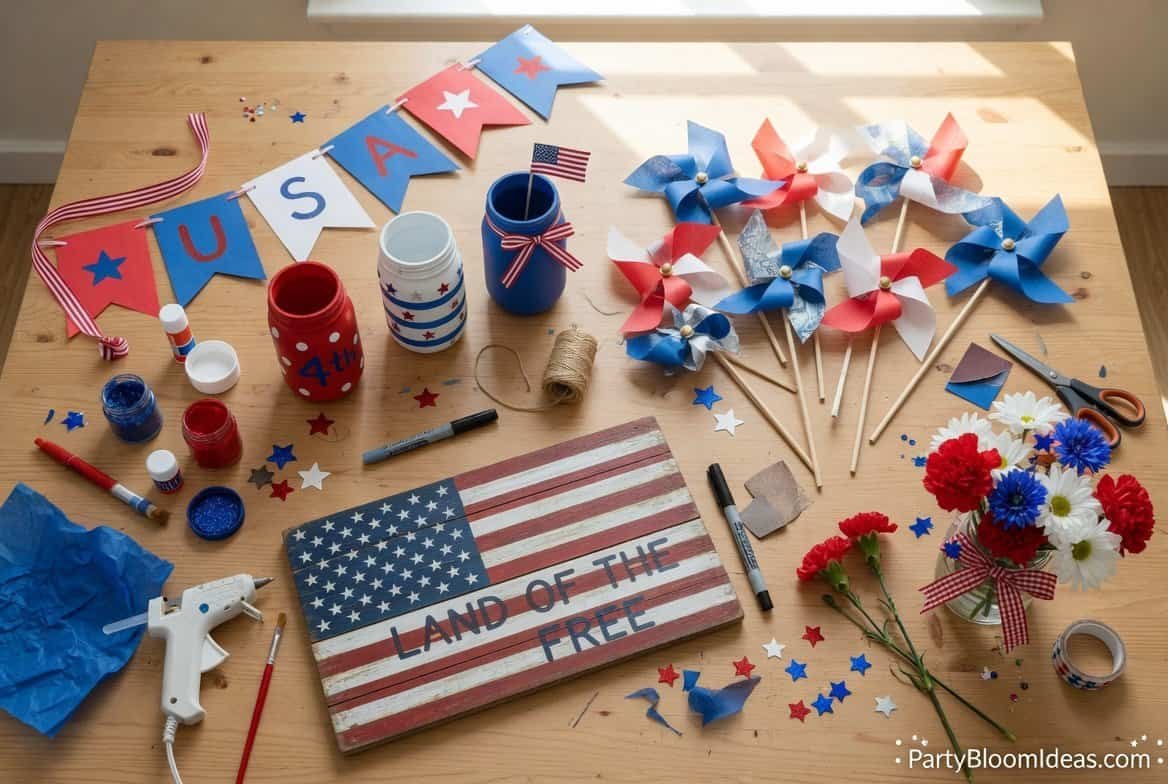
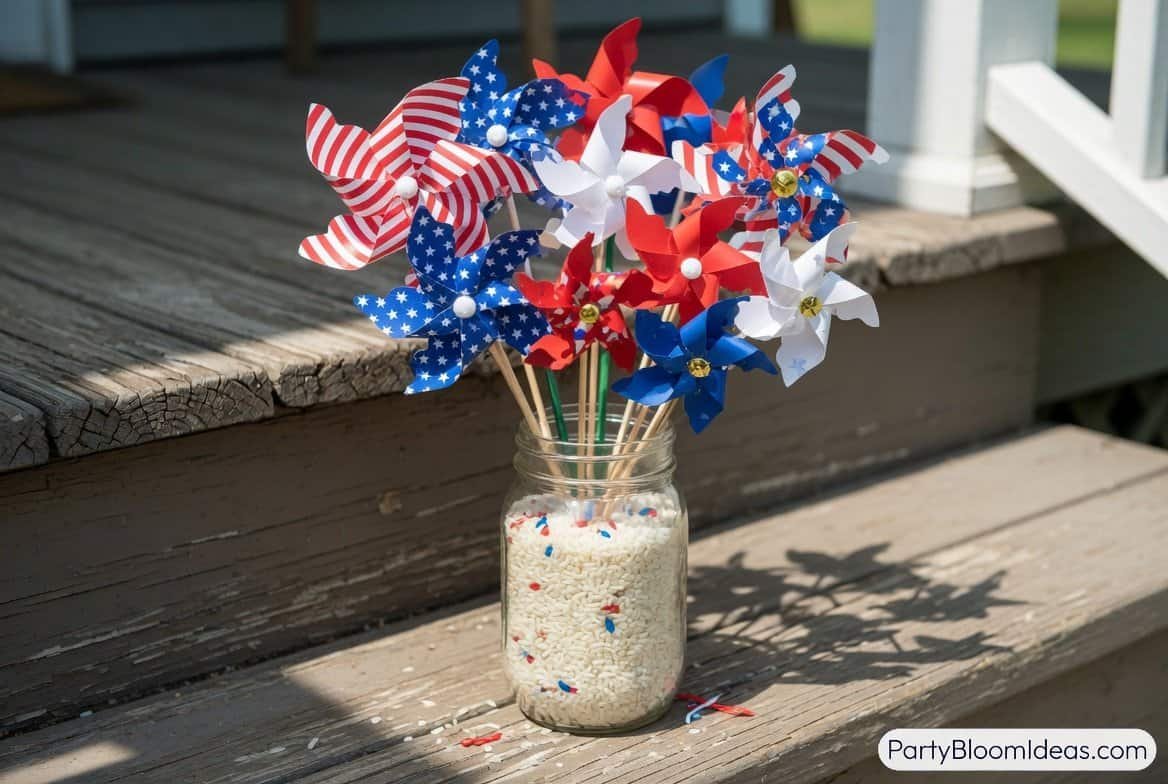
2. Tissue Paper Pinwheel Bouquet (10 Minutes Per Pinwheel)
Pinwheels stuck in a mason jar or flower pot = instant patriotic bouquet. Nobody believes these are DIY.
Supplies:
- Red, white, and blue tissue paper or construction paper (squares, about 6×6 inches)
- Wooden skewers or paper straws
- Push pins or small brads
- A mason jar filled with rice or sand
Fold each square in half diagonally, then fold again. Cut slits from each corner toward the center (not all the way). Pull alternating corners to the center and push a brad or pin through all four corners plus the center. Attach to a skewer.
Make 5 to 7 pinwheels in varying sizes. Stick them all in a mason jar filled with rice (to hold them upright). Set the “bouquet” on your porch or food table.
They spin in the breeze. Kids love them. They cost about $3 total to make.
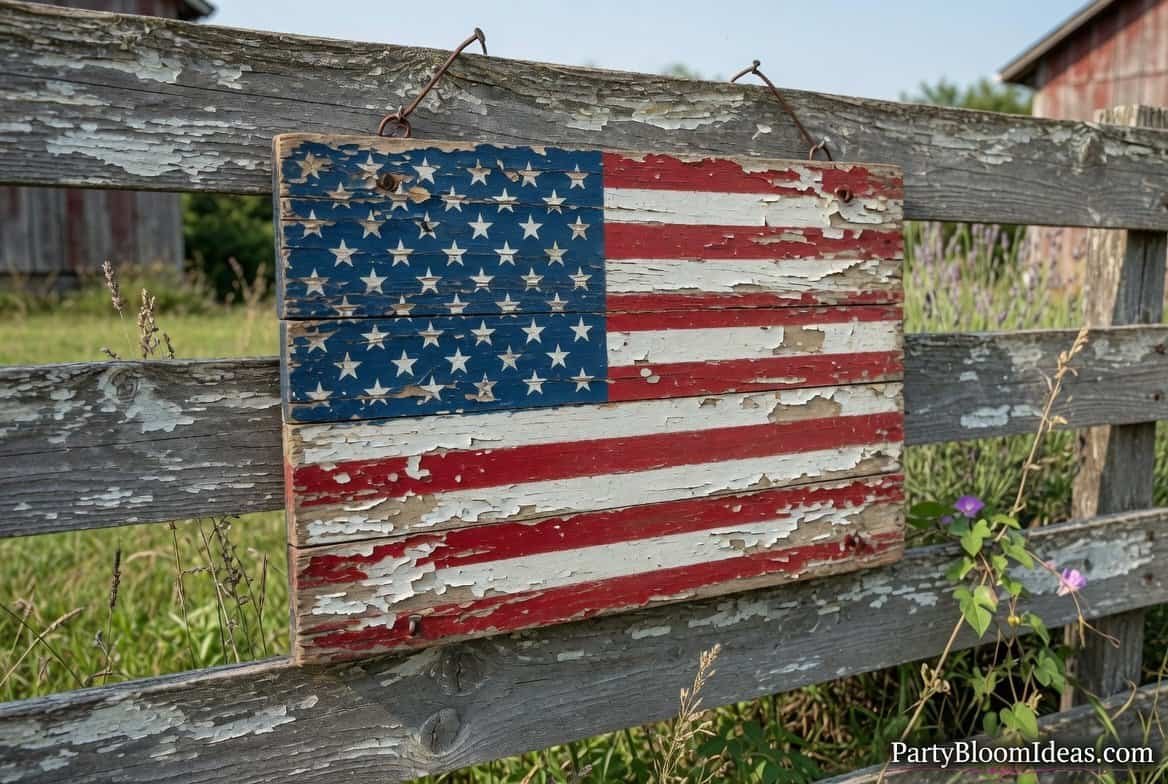
3. Wooden American Flag Sign (Under $10)
A rustic wooden flag sign is one of those “where did you get that?” pieces. You can make one in an hour.
Supplies:
- A wooden pallet plank or a flat piece of scrap wood (free from the curb or $5 at a hardware store)
- Red and white paint
- Blue paint for the star area
- White paint markers for stars
- Painter’s tape
Here is how:
- Sand the wood lightly if it is rough
- Tape off the top-left quarter of the board for the blue “stars” section
- Paint the rest of the board in alternating red and white stripes (use tape to keep lines clean)
- Once that section is dry, paint the top-left section blue
- Use a white paint marker to dot on stars (or stencil them for a cleaner look)
Distress the wood lightly with sandpaper after painting for a weathered, rustic look. Hang it on your fence, front door, or above your food table.
Total cost: about $8 if you need to buy wood, $0 if you find scrap.
4. Paper Plate Stars Banner (Dollar Tree Hack)
This is the easiest banner you will ever make. Kids can help.
Supplies:
- White paper plates (8-pack from Dollar Tree)
- Red, white, and blue paint or markers
- Hole punch
- Twine
- Star stencil or free-hand drawn stars
Paint each plate — alternate red, white, and blue. Once dry, use a white paint marker on the red and blue plates to draw stars. On white plates, use blue paint to draw stars.
Punch holes in the top edges of each plate. Thread twine through the holes to create a banner. Hang between two trees, across a porch, or inside the house.
Takes 30 minutes total including dry time. Total cost: about $3.

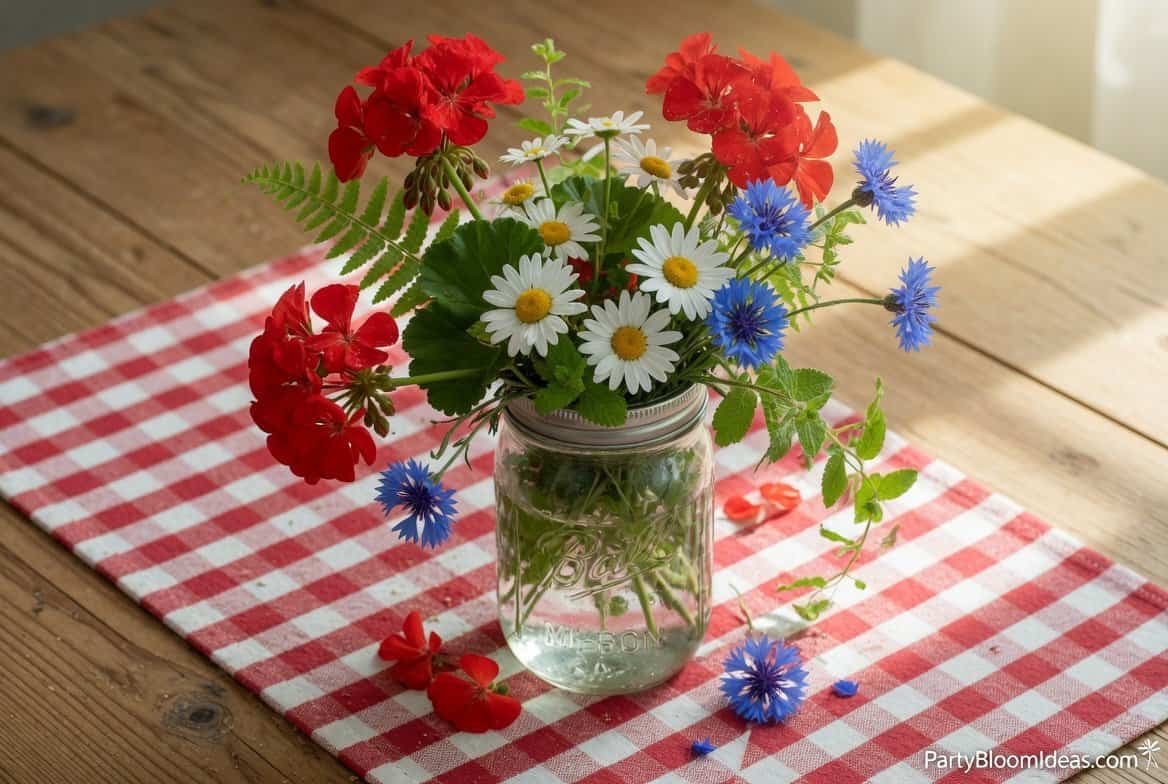
5. Red White Blue Flower Arrangement (Use What You Grow)
If you have a yard, you probably have what you need to make a patriotic arrangement for free.
What to look for:
- Red: Geraniums, red roses, zinnias, red dahlias, snapdragons
- White: Daisies, baby’s breath, white carnations, lilies, Queen Anne’s lace (grows wild)
- Blue: Bachelor’s buttons (cornflowers), hydrangeas, delphinium, blue salvia
If you do not have these growing, hit Trader Joe’s or Whole Foods. They carry red, white, and blue bouquets the week of the 4th for around $10.
Put them in a mason jar or pitcher. Set on your food table or entryway console. Done.
Key trick: pick flowers early morning when they are most hydrated, and trim stems at an angle before putting in water. They last about 5 to 7 days.
6. Cupcake Toppers (Under $3)
If you are serving cupcakes (or any individual dessert), DIY toppers are the finishing detail.
Supplies:
- Toothpicks or small wooden skewers
- Red, white, and blue cardstock or paper
- Small American flag printable (find free ones on Pinterest)
- Tape or glue
Print the small flag image on paper. Cut out each flag. Tape each one to a toothpick. Stick one in each cupcake, fruit skewer, or watermelon slice.
Takes 10 minutes. Costs a couple dollars. Makes a basic dessert look intentional.
You can also use these on drinks — stick toothpick flags into paper drink cups for a coordinated look.
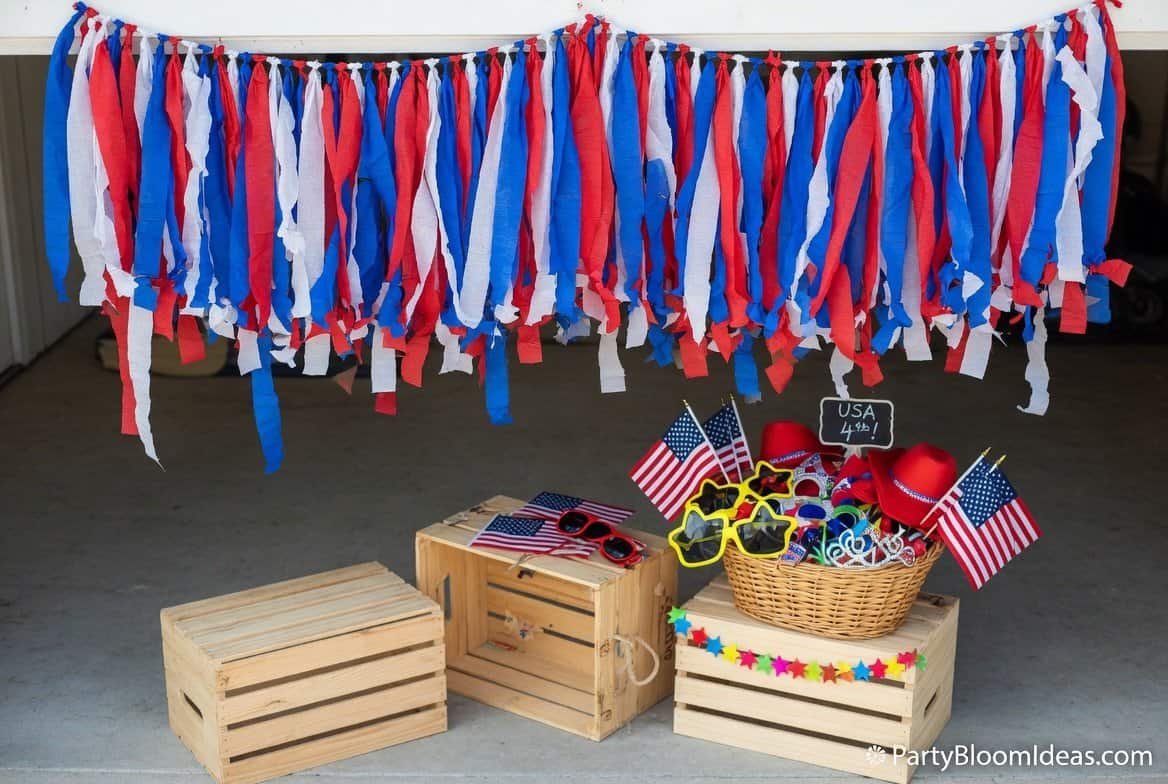
7. DIY Photo Booth Backdrop ($5 to $10)
A photo corner does not require store-bought backdrops. You can make a stunning one for under $10.
Options:
Version 1: The Tablecloth Trick
- Buy a $3 red and white striped tablecloth (Dollar Tree or Amazon)
- Hang it against a wall or fence with tape or tacks
- Add a few blue paper stars stuck to it
- Boom — photo backdrop
Version 2: The Streamer Curtain
- Buy red, white, and blue crepe paper streamers (about $5 total)
- Cut into 5-foot lengths
- Hang them from a curtain rod, broomstick, or clothesline
- The curtain of streamers moves in the breeze and photographs beautifully
Version 3: The Flag Focal
- Hang a large American flag on a fence or wall
- Add a bench or wooden crates in front
- Throw a basket of props beside it — sunglasses, cowboy hats, small flags
Label the spot “Photo Spot” on a small chalkboard or sign. Guests will find it.
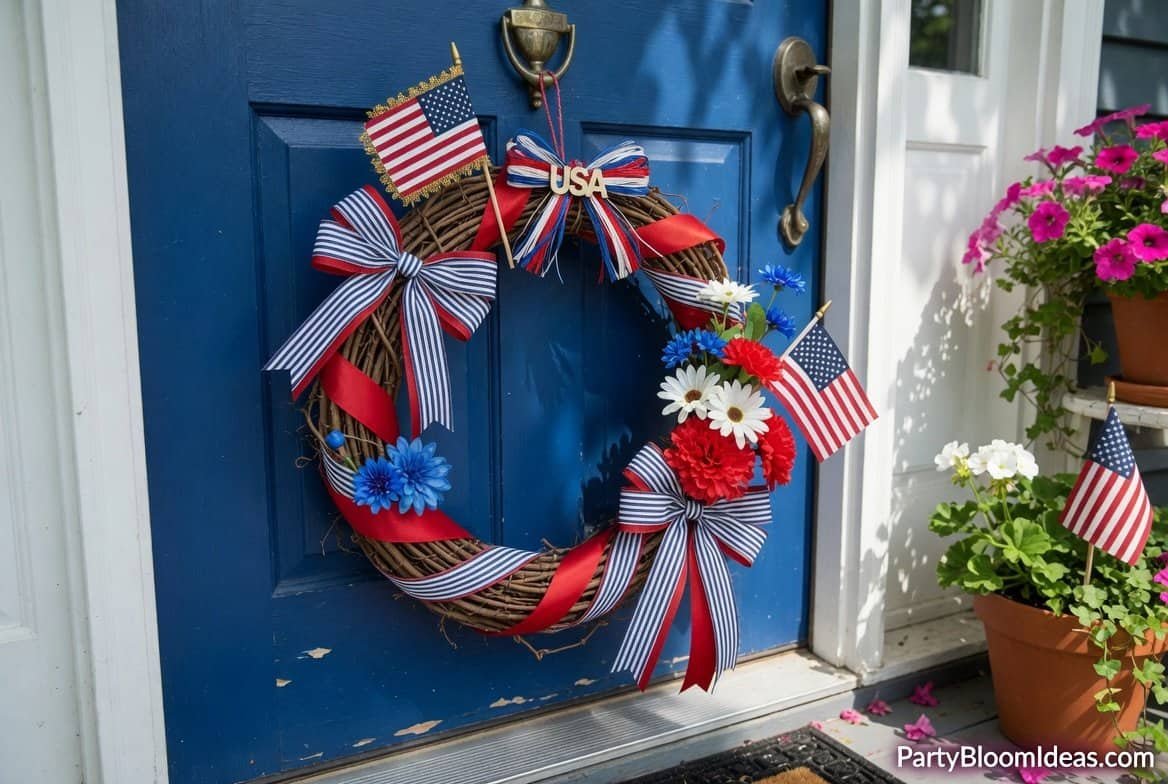
8. Patriotic Wreath for the Front Door (30 Minutes)
A DIY front door wreath signals the 4th of July before guests even ring the doorbell.
Supplies:
- A plain grapevine wreath or foam wreath base ($5 to $10)
- Red, white, and blue ribbon (about 2 yards of each)
- Small American flags on sticks (Dollar Tree pack)
- A hot glue gun
- Optional: artificial flowers in red, white, and blue
Here is how:
- Wrap the wreath base loosely with white ribbon, securing with hot glue
- Tie red and blue ribbon into bows — attach to the top and sides of the wreath
- Stick 3 to 5 small American flags into the wreath at angles
- Add small artificial flowers in red, white, and blue for extra fullness
Hang on the front door with a command hook or wreath hanger. Done.
Total cost: about $12 to $15.
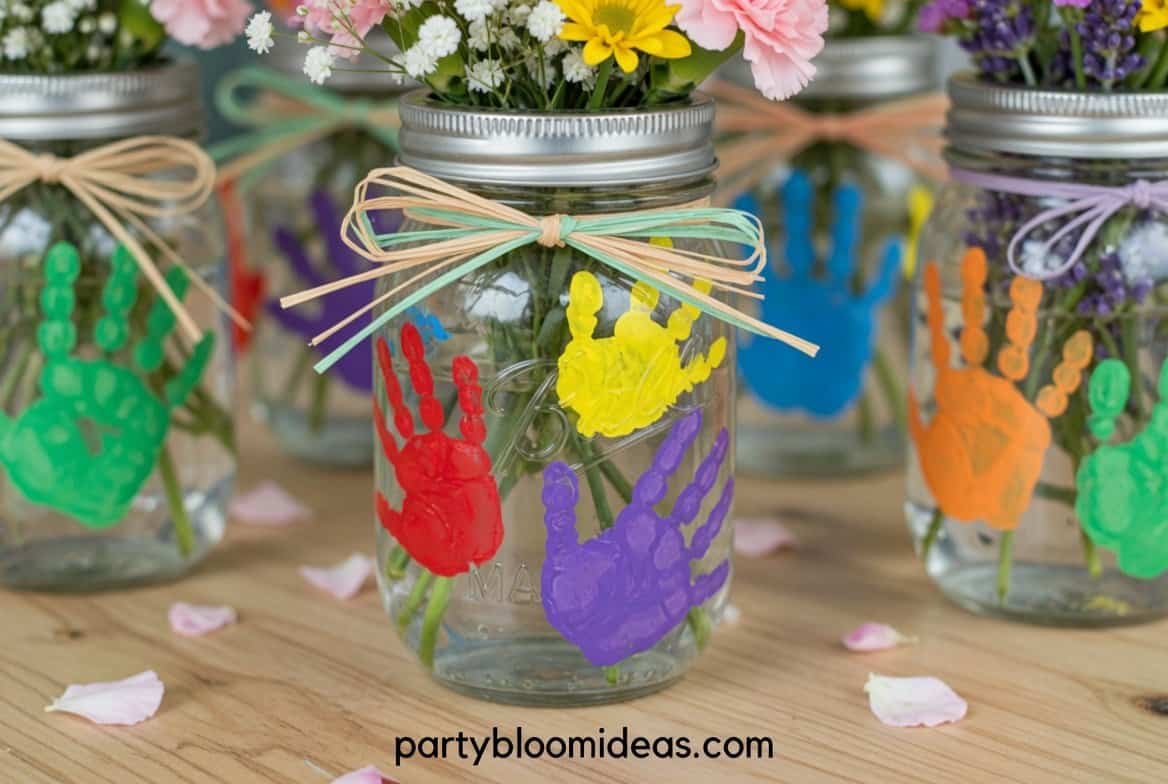
9. Mason Jar Centerpieces with Kids’ Handprints
This one is a family project and the results are meaningful enough that you keep them for years.
Supplies:
- 3 mason jars
- Red, white, and blue acrylic paint
- Paper plates for paint
- Kids’ hands!
Have each kid dip their hand in red paint and press it on one side of a jar. Then white. Then blue. Let the handprints dry. Fill the jars with wildflowers or sparklers.
The jars become annual decorations. You will see how much your kids’ hands grow year to year.
My oldest was 4 when we did this the first year. She is 7 now. That jar has three hands on it, each from a different July. It is the decoration I care about most.
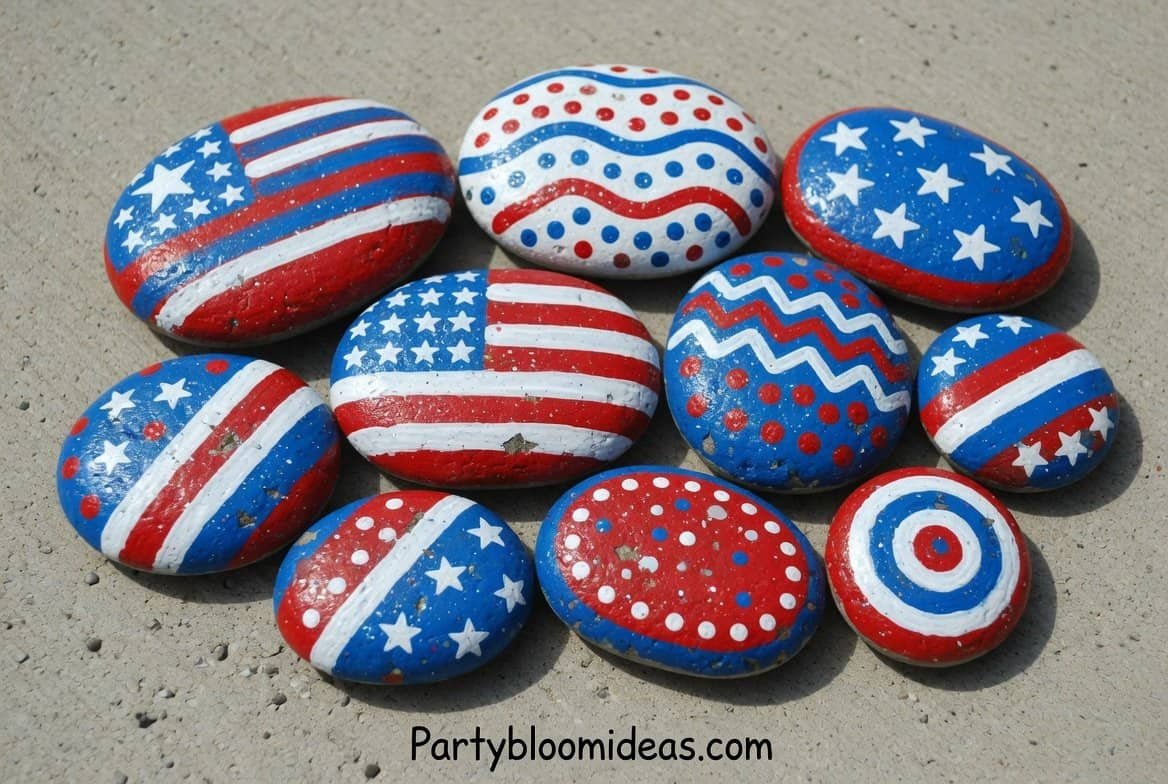
10. Red, White, and Blue Painted Rocks (Yard Decor)
If you have kids, this is a great afternoon project that doubles as yard decor.
Supplies:
- Smooth river rocks (find them in your yard or buy a bag for $5)
- Acrylic paint in red, white, and blue
- White paint pens for fine details
- Waterproof clear sealer (optional, but helps them last)
Paint rocks with stripes, stars, American flags, or words like “USA” or “Freedom.” Kids love doing this.
Once dry, line them along your walkway, use them around the edges of the fire pit, or pile them in a basket as a decoration. After the party, they can stay in the garden as weatherproof art.
Total cost: $5 to $10.
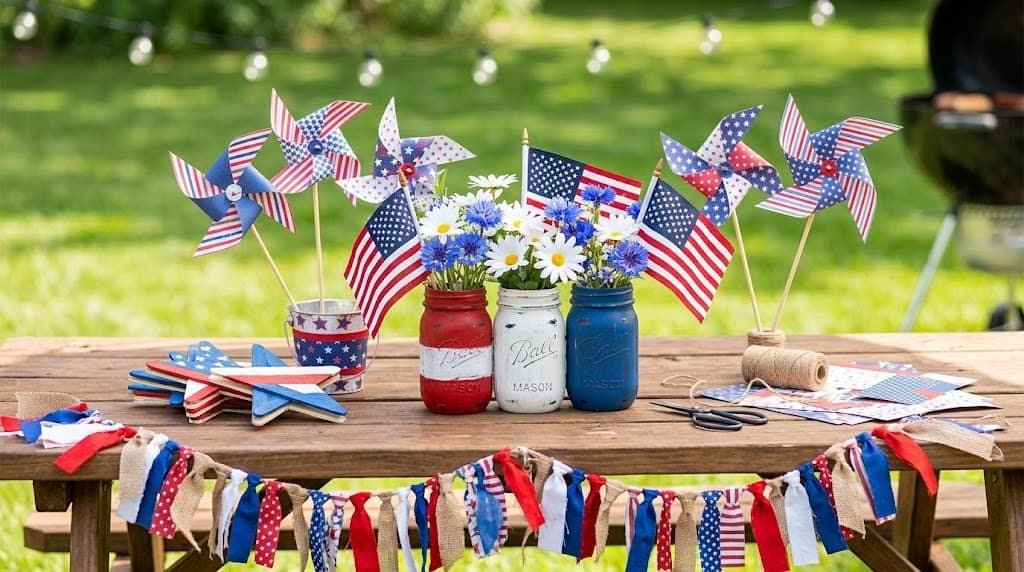
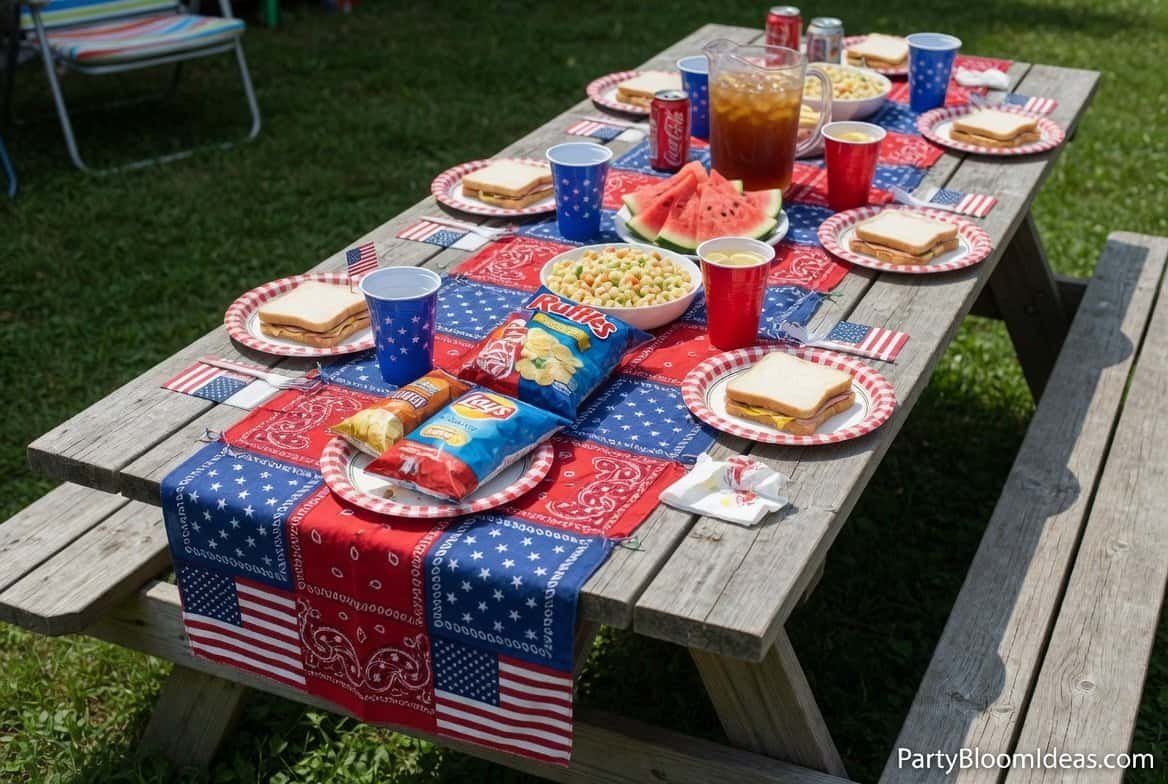
11. Bandana Table Runner ($10 Total)
A table runner made of red and blue bandanas is the easiest DIY table decoration ever.
Supplies:
- 4 red bandanas
- 4 blue bandanas
- (Dollar Tree sells them, 2 for $1)
Line them up alternating red and blue down the center of your table. You can either leave them loose (ties overlap for a casual look) or safety-pin the corners together for a more secured runner.
Total cost: about $4 to $6.
Bonus: after the party, the bandanas are usable as actual bandanas, napkins, or dog accessories. Multi-use decorations are the best kind.
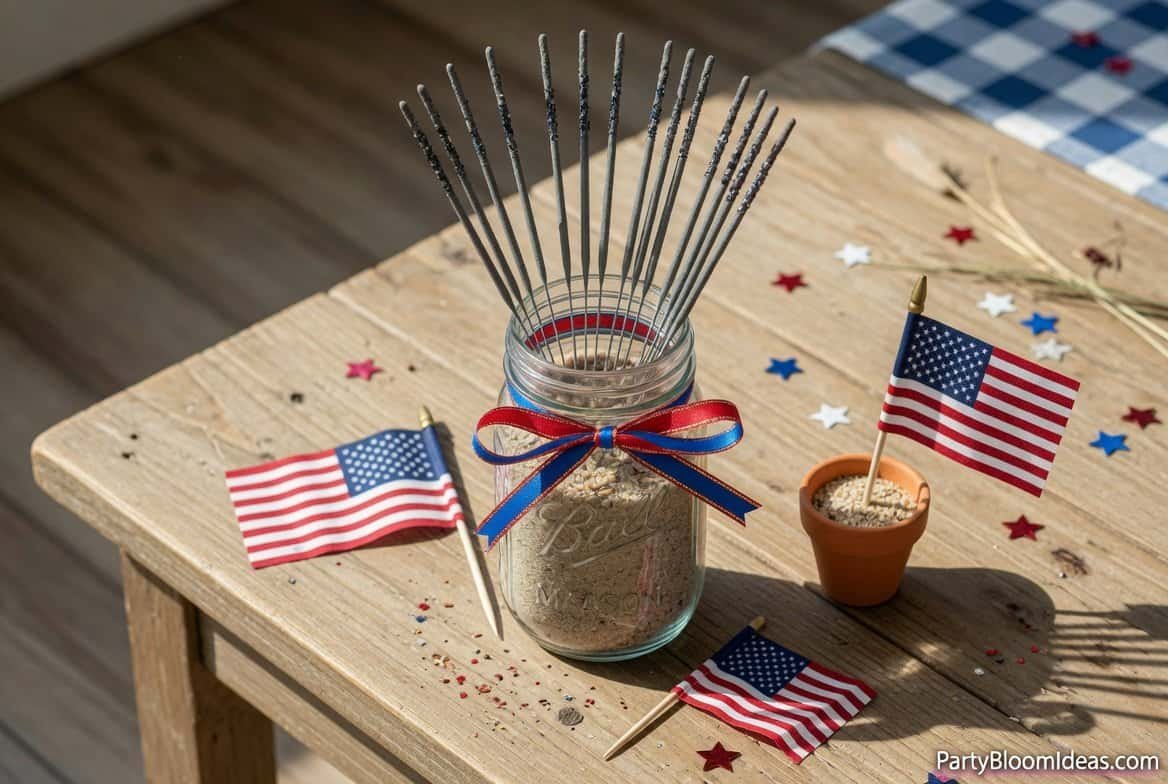
12. DIY Sparkler Holder (Mason Jar + Sand)
Serving sparklers out of a bag looks unorganized. A DIY sparkler display looks intentional.
Supplies:
- 1 large mason jar or vase
- Sand, rice, or small rocks to fill halfway
- A bundle of sparklers
Fill the jar halfway with sand. Stick the sparklers into the sand so they stand upright. Tie a red and blue bow around the jar.
Set on a side table during the day as a decoration. When sparkler time comes, guests grab them from the jar. Functional decor at its best.
Add a small chalkboard sign: “Grab a sparkler after fireworks” or “Light up the night.”
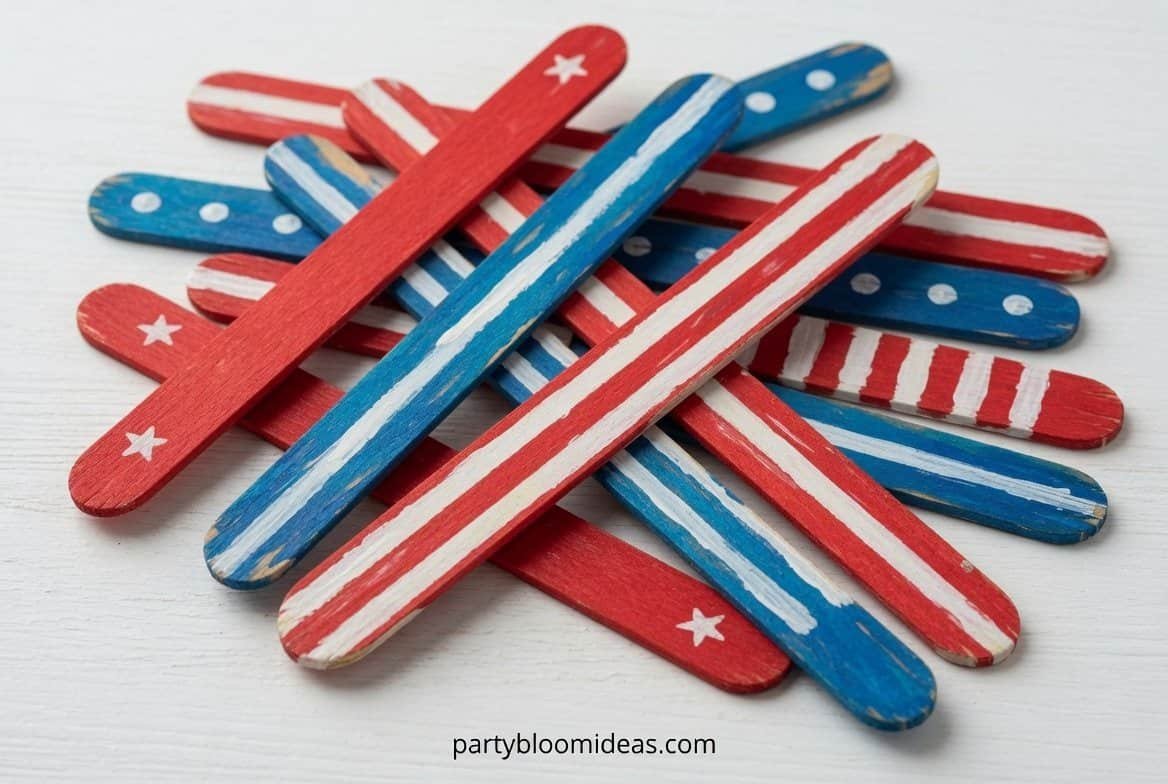
13. Patriotic Popsicle Sticks for Crafts
Craft popsicle sticks painted in stripes can become: star ornaments, tiny flags for cupcakes, garden markers, or mini picture frames.
Supplies:
- A bag of craft popsicle sticks (100 for $3 at Michaels or Amazon)
- Red, white, and blue acrylic paint
- Hot glue
Simplest project: glue 5 painted popsicle sticks together at the corners to form a star. Add a string and hang them as ornaments on a small table tree or from twine across a doorway.
Kids love making these. And 100 sticks of them costs $3.
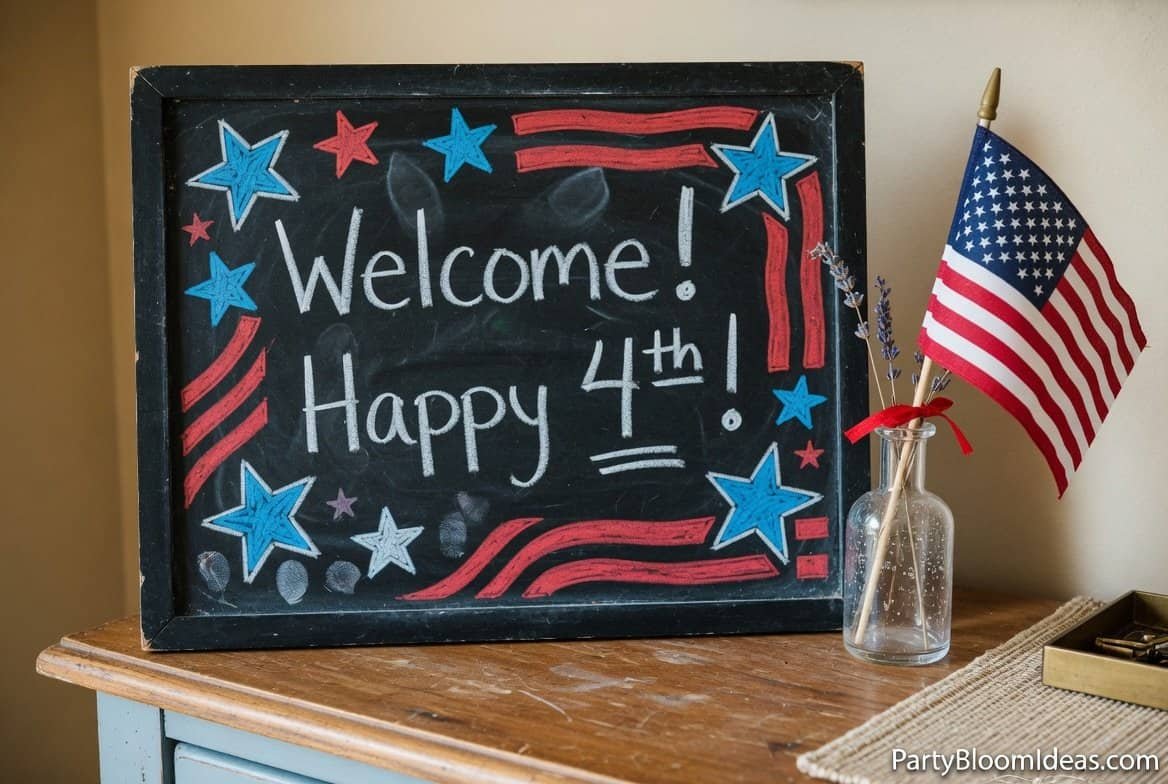
14. Chalkboard Sign (Welcome Your Guests)
A small chalkboard sign at the entrance sets the mood and gives you a spot to write a welcome message.
Supplies:
- A small chalkboard ($5 at Target)
- White chalk or a white chalk marker
- Red and blue chalk markers
Write something simple: “Welcome to our 4th of July” or “Happy Independence Day” or “Grab a drink and stay awhile.”
Decorate with small drawn stars, stripes, or fireworks. Set it by the front door or at the drink station.
Guests notice this instantly. It is one of those small touches that signals “someone actually thought about this party.”
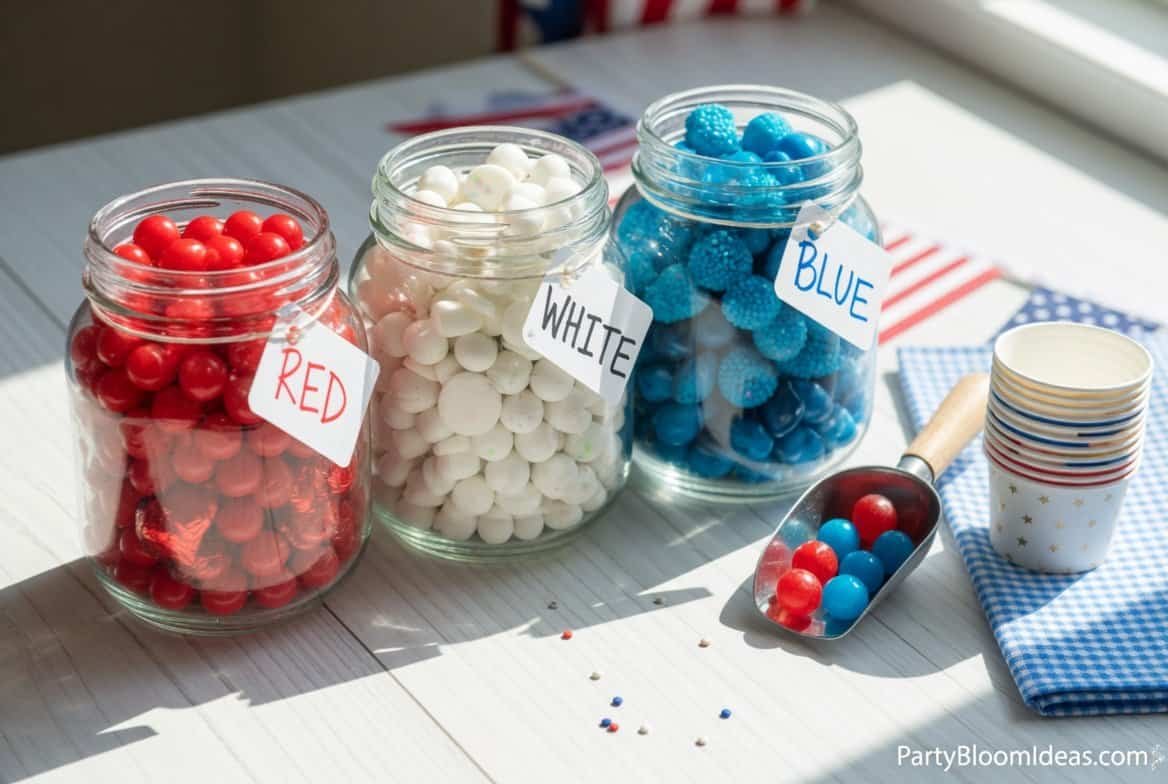
15. Patriotic Candy Jars
Fill glass jars with red, white, and blue candy and line them up on your dessert table.
Supplies:
- 3 clear glass jars (mason jars, cookie jars, or apothecary jars)
- Red candy: Red Starburst, red Skittles, Swedish fish, strawberry Twizzlers
- White candy: Marshmallows, Ice Breakers, white chocolate-covered almonds
- Blue candy: Blue Starburst, blue M&Ms, blue raspberry Dum-Dums
Put each color in its own jar. Set them on your dessert table. Guests scoop into small paper cups.
About $15 total for candy. Looks impressive. Kids will destroy it before the adults even see it.
16. Crepe Paper Garland (30 Minutes)
Crepe paper streamers twisted together make a shockingly pretty garland.
Supplies:
- 1 roll red crepe paper
- 1 roll white crepe paper
- 1 roll blue crepe paper
Cut each roll into 4-foot lengths. Twist one red, one white, and one blue together into a single braided garland. Secure the ends with tape. Repeat until you have enough garland to drape across your space.
Hang it along a fence, across a doorway, around a porch railing, or across the front of your food table.
Takes 30 minutes. Costs about $3.
Warning: crepe paper gets damaged by rain. Use only in covered or indoor areas, or be willing to replace if a storm hits.
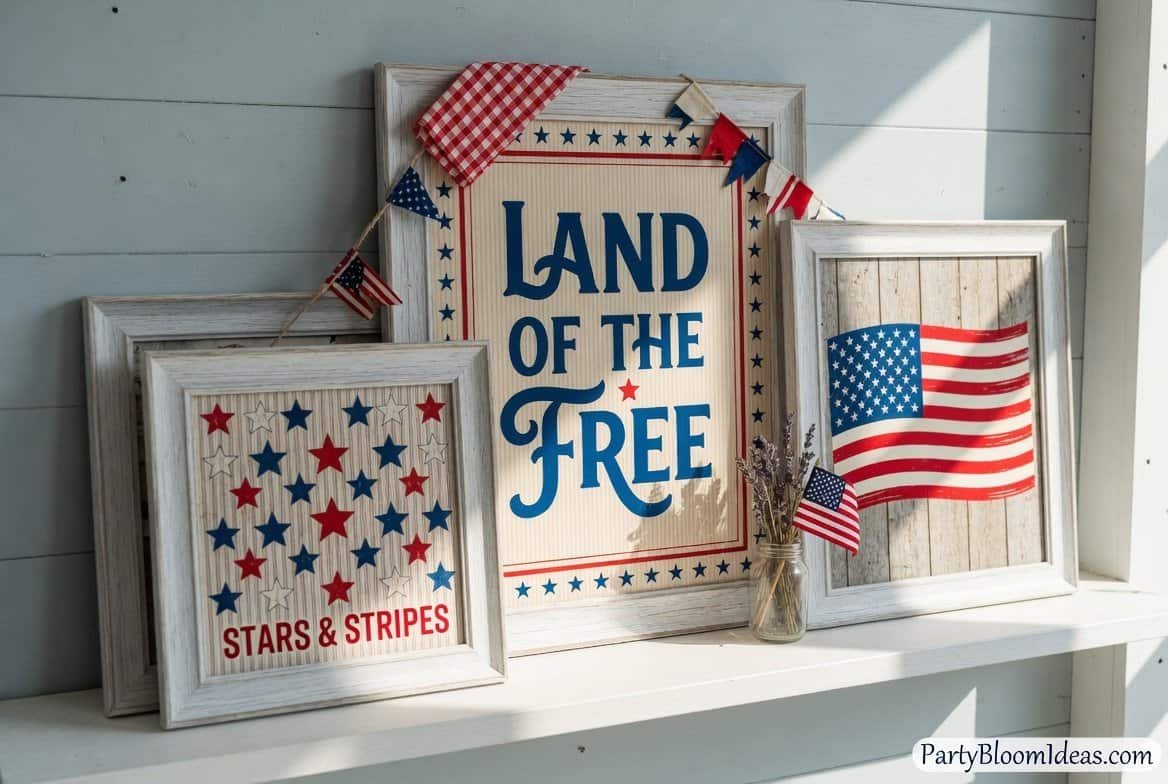
17. Printable Free Art (Instant Decor)
If you do not have time to craft, printable art is the cheat code.
Where to find free printables:
- Pinterest: Search “free 4th of July printable”
- Etsy: Free printable 4th of July art, or under-$5 purchased prints
- Canva: Design your own using their free templates
Print the art on plain paper or cardstock. Stick in picture frames you already own. Set on side tables, bookshelves, entryway consoles, or hang on the wall.
Total cost: pennies, if you have a home printer. Or $3 per print at Staples.
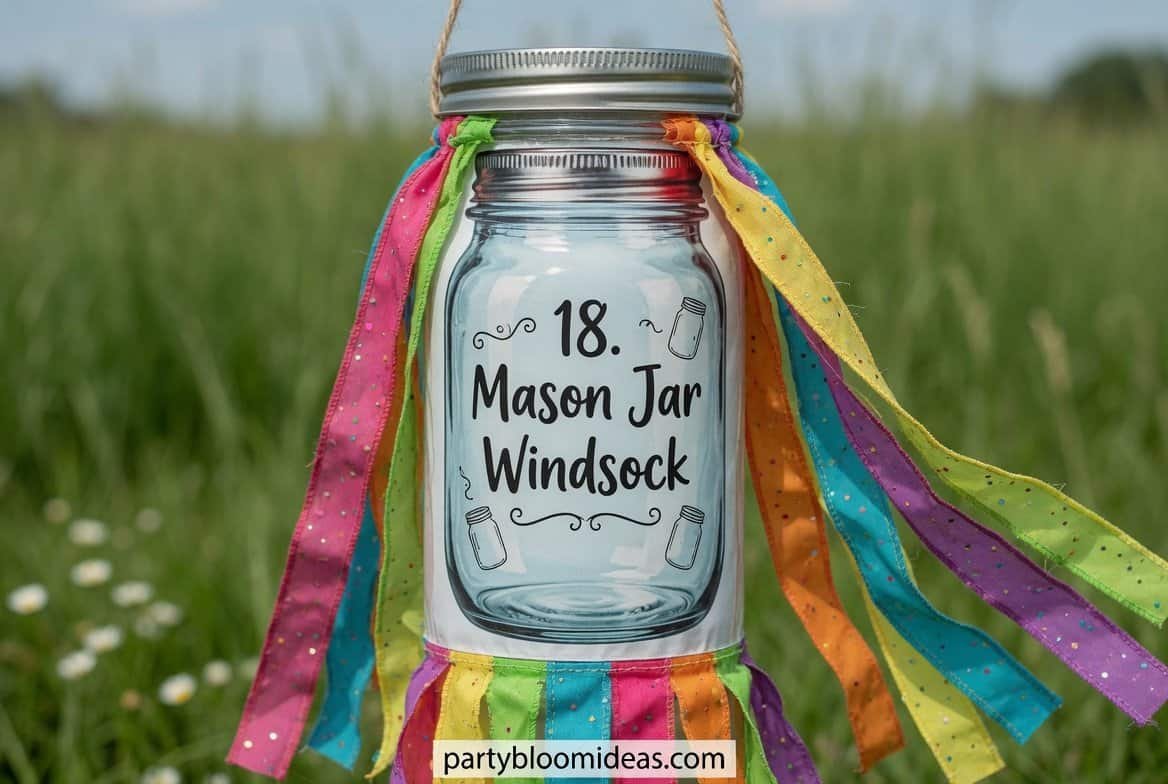
18. Mason Jar Windsock
A mason jar with long ribbons trailing from the bottom becomes a windsock that dances in the breeze.
Supplies:
- 1 mason jar
- Red, white, and blue ribbons (about 10 strands, 2 feet each)
- Twine or fishing line
Attach the ribbons to the bottom rim of the mason jar using hot glue. Tie twine around the mouth of the jar to hang it from a tree branch or porch hook.
When the wind blows, the ribbons flutter. Visually beautiful.
You can also add small jingle bells to a few ribbons so the wind makes soft sounds as it passes through.
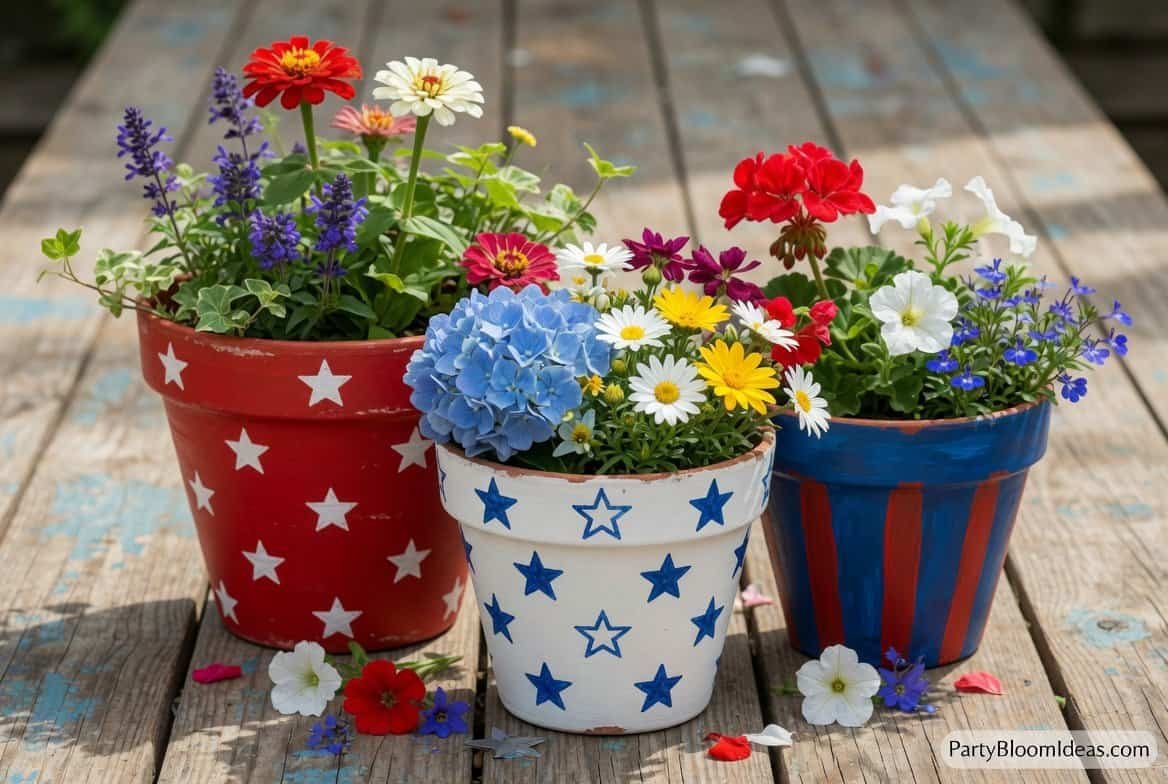
19. Painted Terra Cotta Pot Centerpieces
Terra cotta pots are cheap and paint easily. Turn them into patriotic centerpieces.
Supplies:
- 3 terra cotta pots, different sizes ($1 to $3 each at Dollar Tree or garden centers)
- Red, white, and blue paint
- Live plants or fresh flowers
Paint the pots — one red with white stars, one white with blue stars, one blue with red stripes. Once dry, plant live flowers or herbs in them. Cluster the three together as a centerpiece.
After the 4th, move the pots to your garden or patio. They last for years.
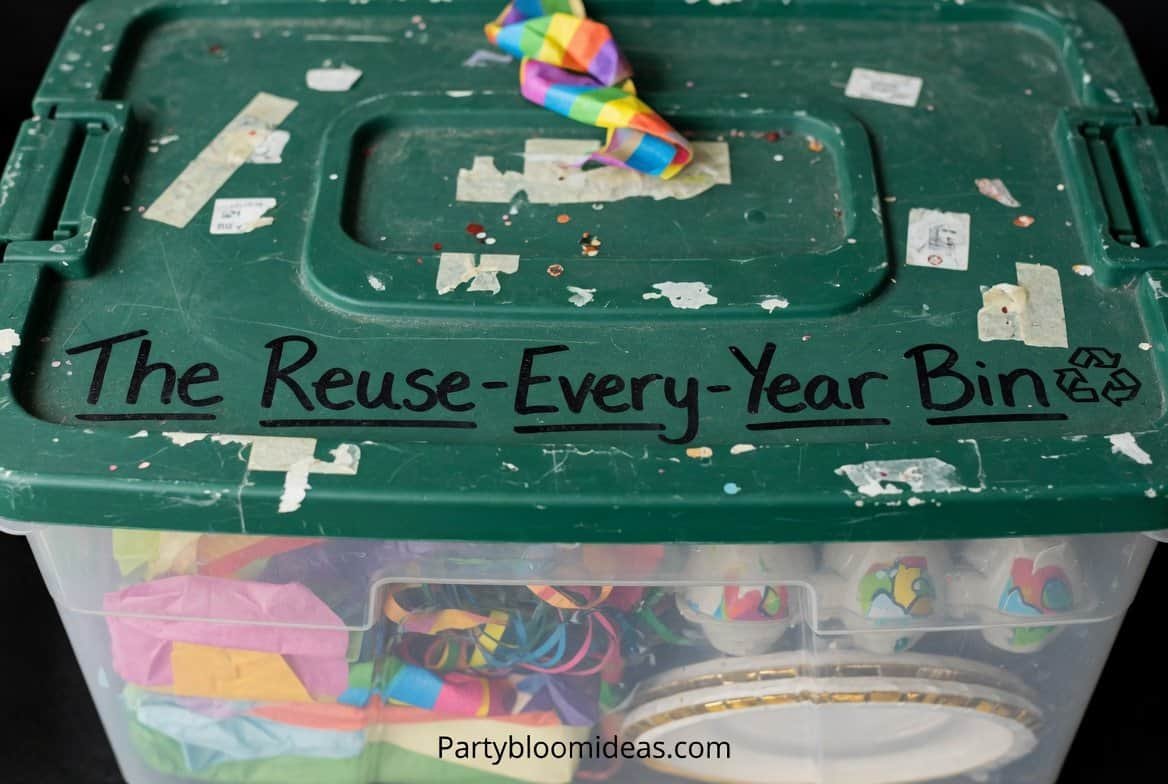
20. The Reuse-Every-Year Bin
Here is the secret that nobody tells you: every DIY decoration you make can be stored and reused next year.
After the party, pack everything you made into a single plastic bin:
- Painted mason jars (carefully wrapped in paper)
- Wooden flag sign
- Patriotic wreath
- Paper plate banner
- Bandana table runner
- Painted pots
- Chalkboard
Label the bin “4th of July” and store it in the garage or basement. Next June, you pull it out, add a few fresh flowers, and you are 80% done decorating.
Your first year of DIY decor costs the most. By year three or four, the party basically decorates itself.
Budget Breakdown
Here’s what all 20 of these DIY projects together actually cost:
| Project | Cost |
|---|---|
| Painted mason jars (3) | $5 |
| Tissue paper pinwheels | $3 |
| Wooden flag sign | $8 |
| Paper plate banner | $3 |
| Flower arrangement (from yard or $10) | $0-10 |
| Cupcake toppers | $2 |
| Photo booth backdrop | $5 |
| Wreath | $12 |
| Handprint jars | $5 |
| Painted rocks | $5 |
| Bandana runner | $5 |
| Sparkler jar | $3 |
| Popsicle stick crafts | $3 |
| Chalkboard sign | $8 |
| Candy jars | $15 |
| Crepe paper garland | $3 |
| Printable art | $5 |
| Mason jar windsock | $3 |
| Painted terra cotta pots | $10 |
| Total (if you did ALL of them) | ~$108 |
Realistically, nobody makes all 20. Pick 5 to 8 projects you like. Total cost: about $40 to $60 for a whole house worth of patriotic decor.
For comparison, a pre-made 4th of July decor kit at Target runs $60 to $100 and looks half as good.
Frequently Asked Questions
When should I start making 4th of July DIY decorations?
Start 2 to 3 weeks before July 4th. This gives paint time to dry, allows you to replace anything that doesn’t turn out well, and avoids last-minute panic. Some projects (like painted mason jars and wooden signs) can be made months in advance and stored.
What’s the cheapest DIY 4th of July decoration?
Tissue paper pinwheels (about $3 total for 7 pinwheels) and the paper plate banner ($3) are the cheapest impactful decorations. Both take under 30 minutes to make.
Can I make DIY decorations with kids?
Absolutely. Painted mason jars, painted rocks, paper plate banners, handprint jars, crepe paper garlands, and popsicle stick crafts are all great kid projects. Keep safety in mind (no hot glue for young kids, no sharp scissors unsupervised) and embrace the imperfect results.
Where can I find DIY 4th of July craft supplies?
Dollar Tree is the top source for paper, paint, ribbons, bandanas, and small flags. Michaels and Joann’s have more variety but cost more. Amazon is best for specific items like crepe paper rolls, star stencils, or large quantities.
How do I store DIY decorations to reuse next year?
Use a single labeled plastic bin. Wrap painted jars in paper to prevent chipping. Store fabric items (bandanas, ribbons) in ziplock bags. Keep wooden signs flat, not stacked. Most DIY decorations last 3 to 5 years if stored properly.
Are DIY decorations weather-resistant?
Only if you seal them. Acrylic paint on wood or rocks lasts outdoors for one season if unsealed. Add a clear waterproof sealer (about $5 at a craft store) for weather protection. Paper crafts like crepe paper and paper plates are indoor or covered-area only.
Can I make these decorations without crafting skills?
Yes. The easiest projects in this article — painted mason jars, bandana runners, printable art, candy jars, and sparkler displays — require no crafting skills. You’re mostly arranging things, not making them.
Related Articles
- 4th of July Party Ideas That Are Red, White, and Unforgettable
- 20 4th of July Party Games for the Whole Family
- 15 DIY Balloon Arch Ideas for Any Party
- 30 Best Summer Party Ideas for the Ultimate Backyard Bash
Which DIY decoration are you going to try first? Drop a comment and let me know what you’re making this year.
Read More : 20 kids Birthday Party Themes