Last spring, Emma threw a graduation party for her daughter in the backyard. I helped her set it up the morning of, and one corner almost didn’t make the cut — we were short on time, and the “photo wall” she’d planned was just a gold sequin curtain hung from a tension rod between two shepherd’s hooks, with a ring light on a tripod in front. Simple. Borderline too simple, I thought.
By 6 p.m., every single person at that party had been photographed in front of it at least twice. The food table sat untouched for the first twenty minutes. Emma’s daughter and her friends were still texting each other photos days later. That corner made the party.
That’s the thing about the best DIY Photo Booth Ideas for Any Party — they don’t have to be expensive or complicated to become the highlight of the event. Over the years, I’ve seen countless DIY Photo Booth Ideas for Any Party turn an ordinary gathering into a memorable experience simply because they were fun, accessible, and easy for guests to use.
Here’s what actually works: a DIY photo booth doesn’t need to be elaborate. It needs to be lit well, easy to use, and placed somewhere guests can actually reach. This guide covers 10 of the best DIY Photo Booth Ideas for Any Party I’ve tested and borrowed from people like Emma — what they cost, how long they take, what makes them work, and what to skip entirely.
What a DIY Party Photo Booth Actually Means (And What It Doesn’t)
What it IS:
- A designated spot with a backdrop, some props, and decent lighting where guests can take photos — with their own phones, a Polaroid camera, or a tripod setup
- Something that takes 15 minutes to 2 hours to assemble using materials from Dollar Tree, Target, or Amazon
- A focal point that gives guests something to do and creates a cluster of photos all in one aesthetic
What it ISN’T:
- A rented enclosure with a printer and an attendant (that’s a commercial photo booth, and it costs $400–$800)
- A balloon wall with 300+ balloons that takes four hours and deflates overnight
- Complicated — the setups that get used most are usually the simplest ones
The trick is placement and lighting, not budget. I’ll say that again at the end because it keeps being true.
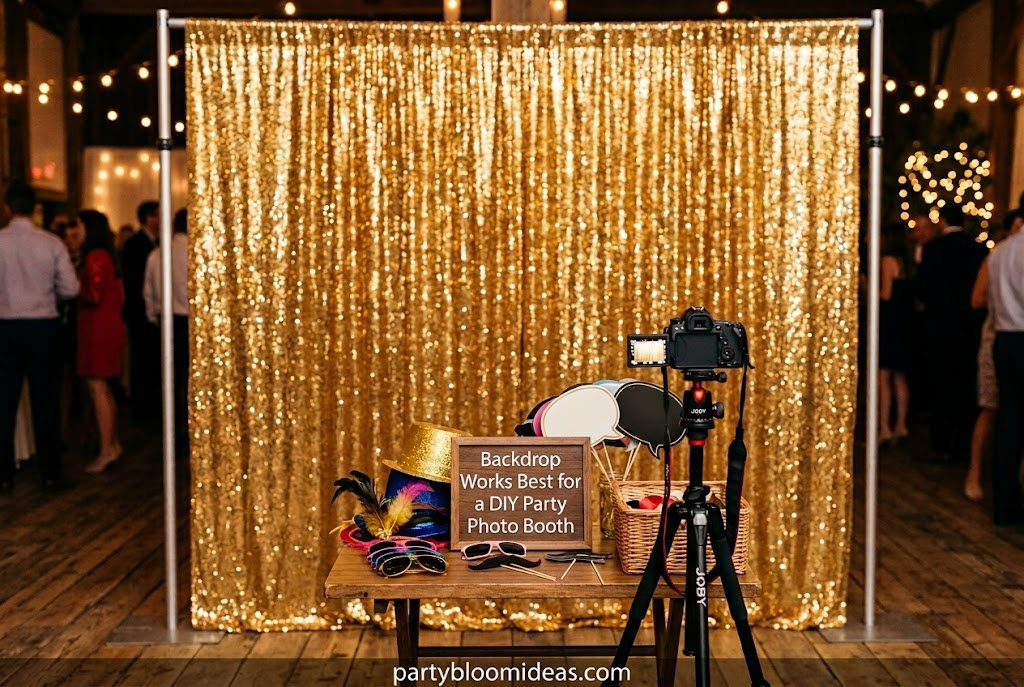
What Backdrop Works Best for a DIY Party Photo Booth?
Different backdrops serve different parties. Here are 10 ideas that genuinely work — tested, priced honestly, with real setup times.
1. Gold Sequin Curtain Backdrop
Best for: NYE, milestone birthdays, bachelorette parties, retirement parties | Wow Factor: 9/10
This is Emma’s go-to and it’s mine now too. Three gold sequin tablecloths ($1.25 each at Dollar Tree) folded lengthwise and hung from a tension rod cover a standard 6-foot-wide space. The sequins catch any available light — outdoor sun, indoor lamps, a ring light — and the shimmer photographs beautifully even on phone cameras.
Supplies:
- 3 gold sequin tablecloths — $3.75 (Dollar Tree)
- 1 tension rod — $5–$7 (Target or Amazon)
- Command hooks if you don’t have a doorframe — $3
Total: $12–$14
Setup time: 15 minutes. Done right, this looks like a professional event backdrop. Done wrong (too narrow, wrong placement, bad lighting), it looks like a foil curtain from a party supply store. The difference is width — cover the full wall segment, not just a strip.
💡 Pro Tip: Hang it in front of a window during daytime events and let natural light do the work. At evening parties, place a $12 ring light on a tripod 4–5 feet in front of the curtain, at eye level. That’s the entire formula.
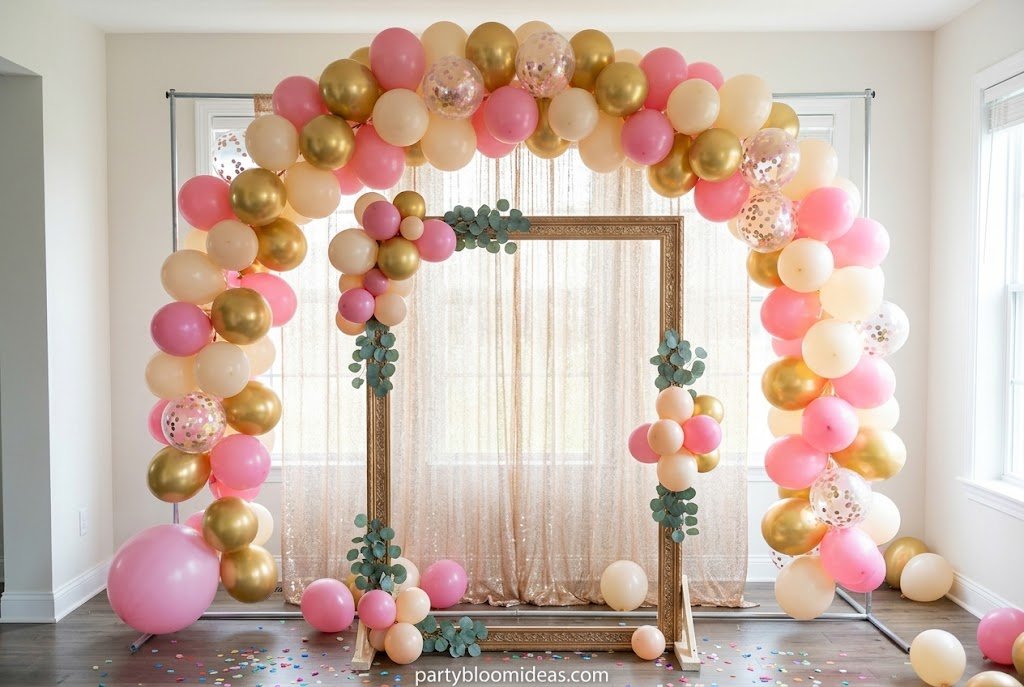
2. Balloon Arch Frame Booth
Best for: Baby showers, bridal showers, adult birthday parties | Wow Factor: 8/10
A freestanding PVC pipe arch with 60–80 balloons is the most versatile option if you want dimension. The key is keeping the color palette tight — two tones maximum. Blush and ivory. Sage and white. Dusty rose and gold. The moment you go to four colors it starts looking like a clearance sale.
Supplies:
- Two 10-foot PVC pipes, elbow connectors — $6 total (hardware store)
- Balloon decorating strip — $1.25 (Dollar Tree)
- 70–80 latex balloons in 2 colors — $8–$10 (Dollar Tree, 2 packs of 36)
- Hand balloon pump — $6 (Amazon)
Total: $21–$23
Setup time: 90 minutes. I learned the hard way that you should NEVER build a balloon arch outdoors in summer heat. I hosted a June birthday party and by 5 p.m., the balloons were wilting and listing sideways. I stripped them off and used a gold sequin curtain as backup. If you’re outdoors in warm weather, go with fabric, paper, or greenery instead.
DIY tip: Use the balloon decorating strip from Dollar Tree — you snap balloons in alternating sizes along the strip, then shape the whole thing onto your PVC frame. No glue, no wire, no knots. It takes 45 minutes instead of three hours.
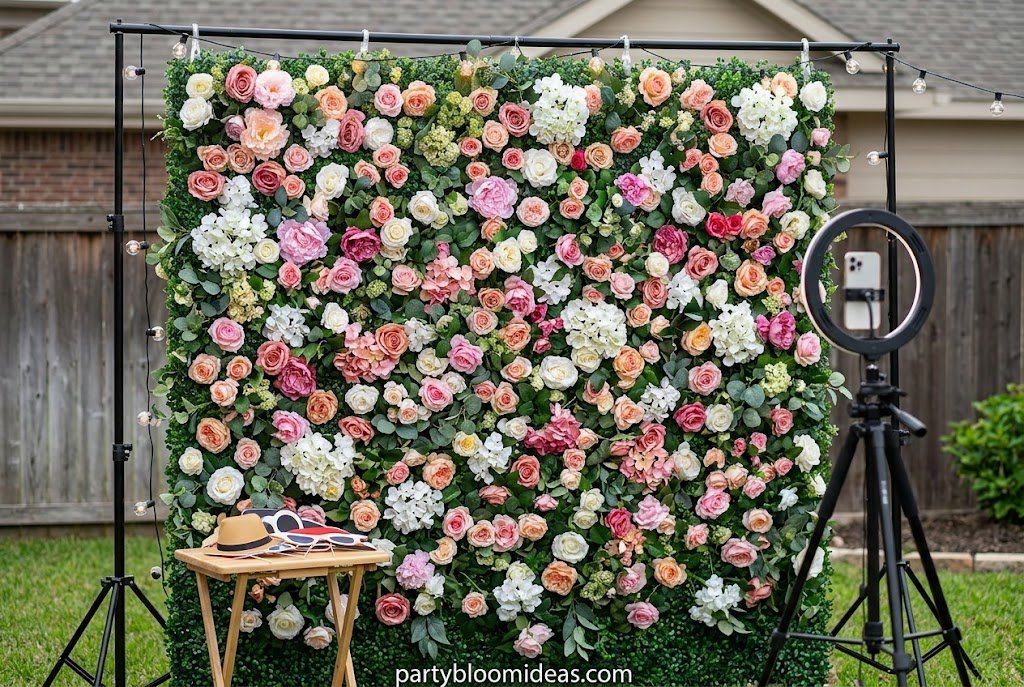
3. Faux Floral Wall
Best for: Bridal showers, spring/summer parties, garden-themed events | Wow Factor: 9/10
A flat panel covered in faux florals is one of the most-photographed backdrops at any shower. The Dollar Tree floral section photographs better than most hosts expect — especially the peonies and hydrangeas in blush, white, and cream. I’ve tested this at four different showers and the photos are consistently great.
Supplies:
- 8–10 bundles faux flowers — $10–$12 (Dollar Tree)
- 2 foam core boards ($1 each, Dollar Tree) OR a section of wood lattice from hardware store ($8–$12)
- Hot glue gun + sticks — $4 (Target dollar section)
- Ribbon for hanging — $2
Total: $16–$30 depending on size
Setup time: 2 hours. This is the most labor-intensive option on this list but also the one that photographs best for upscale occasions. The trick is layering — start with larger blooms, fill gaps with smaller ones, add greenery last.
💡 Pro Tip: Don’t cover every inch of the board. Leave 15–20% visible — the small gaps make the arrangement look natural and intentional instead of stuffed. Done right, it looks like a florist wall. Done wrong, it looks like foam board covered in craft supplies.
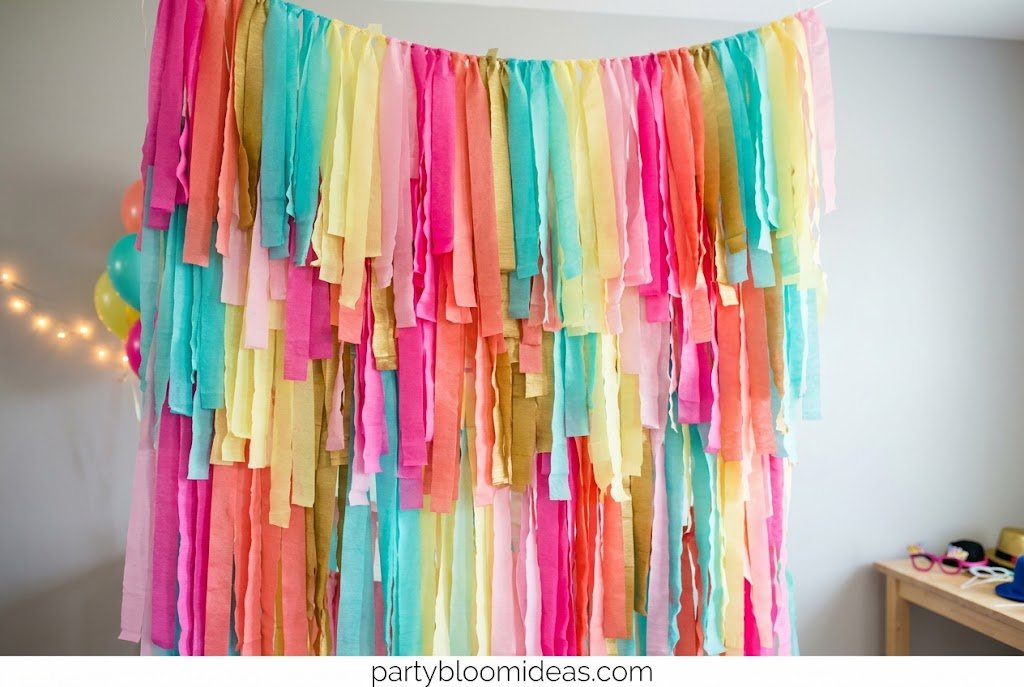
4. Streamer Fringe Curtain
Best for: NYE, prom, graduation, bachelorette parties | Wow Factor: 8/10
Metallic streamers cut into equal lengths and hung side by side from a rod or dowel. This one sounds too simple until you see it in photos. The fringe catches light and moves when guests step in front of it — every photo has a slightly different look. Guests love it because they feel like they’re in a music video.
Supplies:
- 4–6 rolls metallic streamers — $5–$7 (Dollar Tree)
- Wooden dowel or tension rod — $3–$6
- Tape or ribbon to attach strips to rod
Total: $8–$13
Setup time: 30 minutes. Cut each streamer roll into 5-foot lengths, bundle 10–15 strips together, tie at the top, repeat until the rod is full. The more densely packed, the better. Gold works for most parties; silver for NYE; rose gold for bachelorette events. Avoid mixing metallic colors — one metallic tone is elegant, two looks like leftover holiday décor.
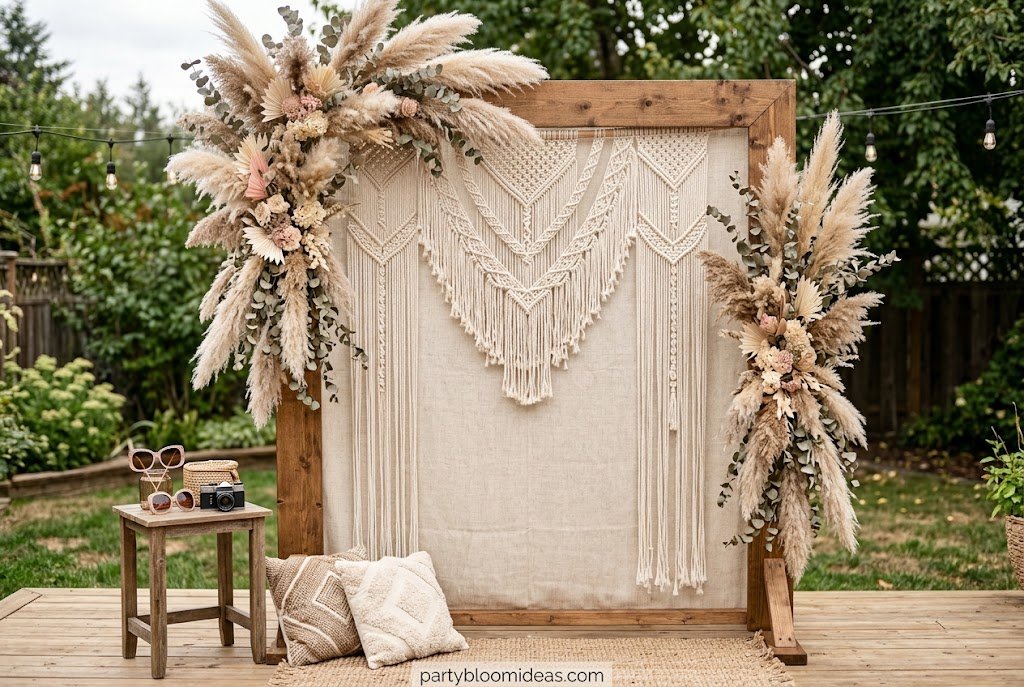
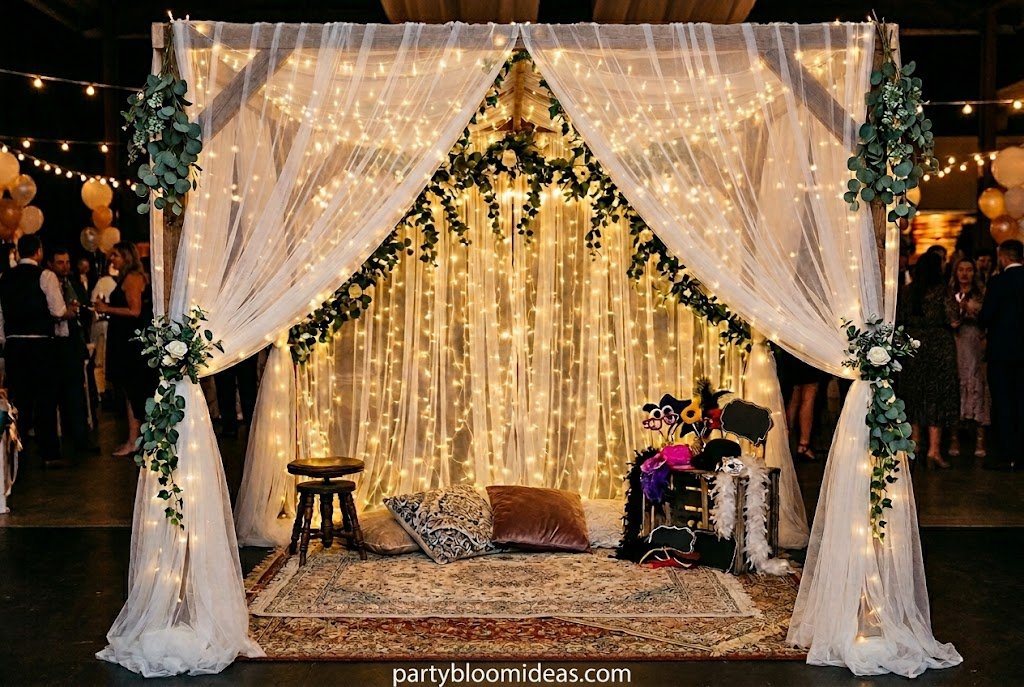
5. Boho Macramé + Pampas Grass Frame
Best for: Boho-themed parties, bridal showers, outdoor evening gatherings | Wow Factor: 9/10
A natural wood dowel frame hung with macramé and decorated with pampas grass, eucalyptus sprigs, and fairy lights. Emma used this for a friend’s bridal shower last fall and it was the most-photographed element of the whole event — and it cost her $26. Guests walked in and the aesthetic landed immediately. By 10 p.m., nobody wanted to leave that corner.
Supplies:
- Dowel rod (1 inch diameter, 4–5 feet wide) — $4 (Walmart)
- Natural macramé rope — $8 (Amazon)
- Pampas grass bundle (5–8 stems) — $6 (Amazon or Hobby Lobby 40% off)
- Faux eucalyptus stems — $3 (Dollar Tree)
- Warm fairy lights, 1 strand — $4–$6 (Dollar Tree)
Total: $25–$27
Setup time: 2 hours, including basic macramé knotting (no experience needed — a simple knot pattern works). Hang it from the ceiling with Command hooks or from an outdoor structure. Natural light during day; fairy lights for evening shots.
6. Neon Sign + Simple Dark Backdrop
Best for: 21st birthdays, 30th/40th milestone parties, bachelorette events | Wow Factor: 8/10
An LED neon sign with a dark fabric or paper backdrop is the modern, graphic option. It photographs sharply, reads instantly in photos, and is completely on-trend without feeling like it’s trying too hard. The sign becomes the prop — you don’t need much else.
Supplies:
- Black tablecloths as backdrop panels — $3–$4 (Dollar Tree, 2–3 tablecloths)
- LED neon sign — $18–$30 (Amazon — search “birthday neon sign” or pick a quote)
- Command hooks or tension rod — $3–$5
Total: $24–$39
Setup time: 20 minutes. The easier it is to set up, the more likely you are to get it right. One caveat: choose the sign carefully. Generic signs like “Smile” or “Love” don’t add much. Occasion-specific ones (“Finally 30,” “She Said Yes,” “Class of 2026”) make the photo mean something.
💡 Pro Tip: Add a single metallic balloon number or a small floral arrangement at the base of the sign setup — it grounds the installation and adds one more photo element without cluttering the backdrop.
7. Fairy Light Canopy Booth
Best for: Outdoor evening parties, summer birthday parties, garden gatherings | Wow Factor: 9/10
Four to five strands of warm white fairy lights strung horizontally above and around the booth area, creating a glowing canopy. This works especially well outdoors at dusk — when the sky turns blue-gray and the warm lights glow against it, the photos are breathtaking. I’ve done this version at three summer parties and it never misses.
Supplies:
- 4–5 fairy light strands — $5–$7.50 (Dollar Tree, $.25 × 4 packs or similar)
- Extension cord (if needed) — already have it
- Two poles, shepherd’s hooks, or existing structure
Total: $18–$25
Setup time: 45 minutes. String lights horizontally between two fixed points — shepherd’s hooks driven into the ground work perfectly outdoors. Space 4–6 inches between strands. Position the booth below so the canopy is overhead. You don’t need a backdrop — the curtain of lights IS the backdrop.
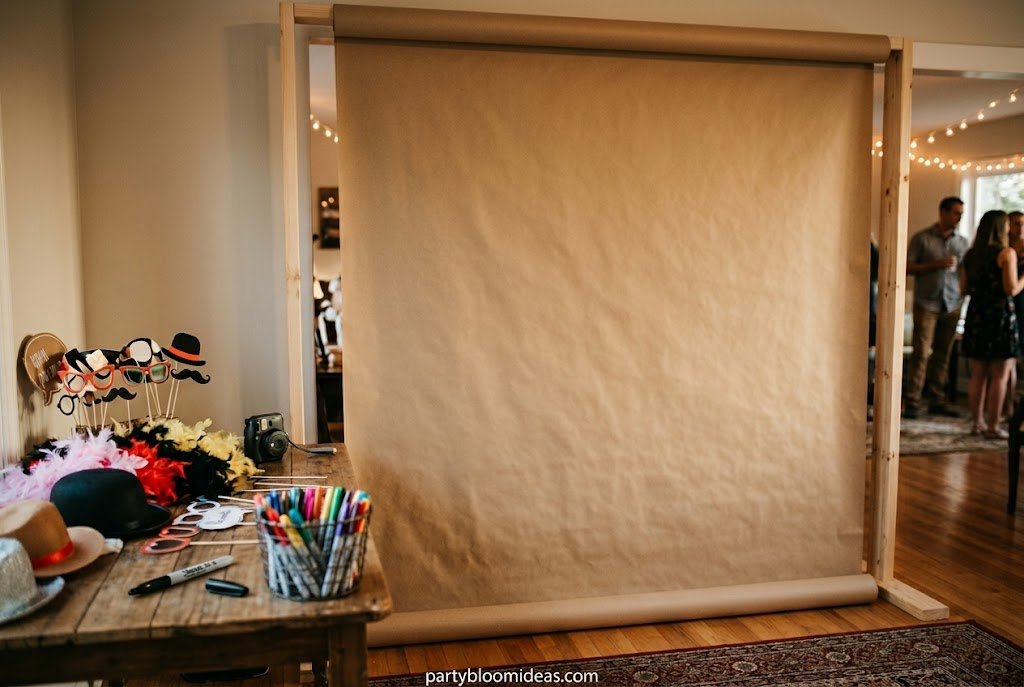
8. Kraft Paper Backdrop (Interactive Version)
Best for: Kids’ birthday parties, casual friend gatherings, gender-neutral events | Wow Factor: 7/10
A 36-inch roll of kraft paper (brown or white) hung on a wall as the backdrop, with markers and rubber stamps set out for guests to leave doodles, notes, or their signature. By the end of the party the backdrop IS a party artifact — and kids especially love it.
Supplies:
- Kraft paper roll, 36 inches wide — $8 (Amazon or Target)
- 4–6 Sharpies in various colors — $5
- Rubber stamps + ink pads (optional) — $5–$8
- Painter’s tape for hanging — already have it
Total: $18–$21
Setup time: 20 minutes. Tape the paper to the wall with painter’s tape — it comes off without damaging paint. The interactive version: put out the markers BEFORE guests arrive so the first arrivals start the tradition. By the end of the night it’s covered. It doubles as a guest book replacement.
9. Tabletop Selfie Station
Best for: Small indoor parties, office parties, apartment gatherings | Wow Factor: 6/10
A compact setup on a table: small ring light clipped to a phone holder, a small foam board backdrop propped upright behind, and 4–6 props in a small container. Overlooked by most hosts because it doesn’t photograph as dramatically on its own — but it gets used consistently all night because it’s at eye level when guests are seated.
Supplies:
- 8-inch clip-on ring light — $12 (Amazon)
- Phone holder/tripod — $8–$10 (Amazon)
- Foam core board, 20×30 inches — $1.25 (Dollar Tree)
- 1 sheet wrapping paper for backdrop panel — $2–$3
Total: $23–$26
Setup time: 15 minutes. The clip-on ring light attaches to the top of the phone holder. Prop the foam board upright behind it. For the backdrop, tape a single sheet of wrapping paper or fabric swatch to the foam board — instant themed backdrop. If you’re hosting in a small living room, this is what you want.
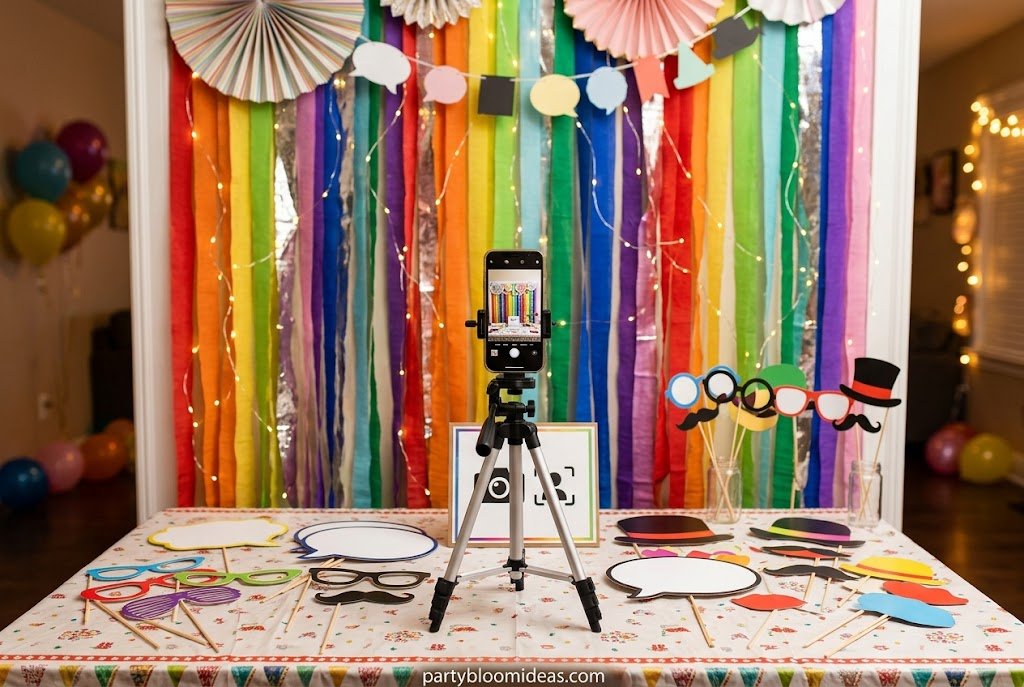
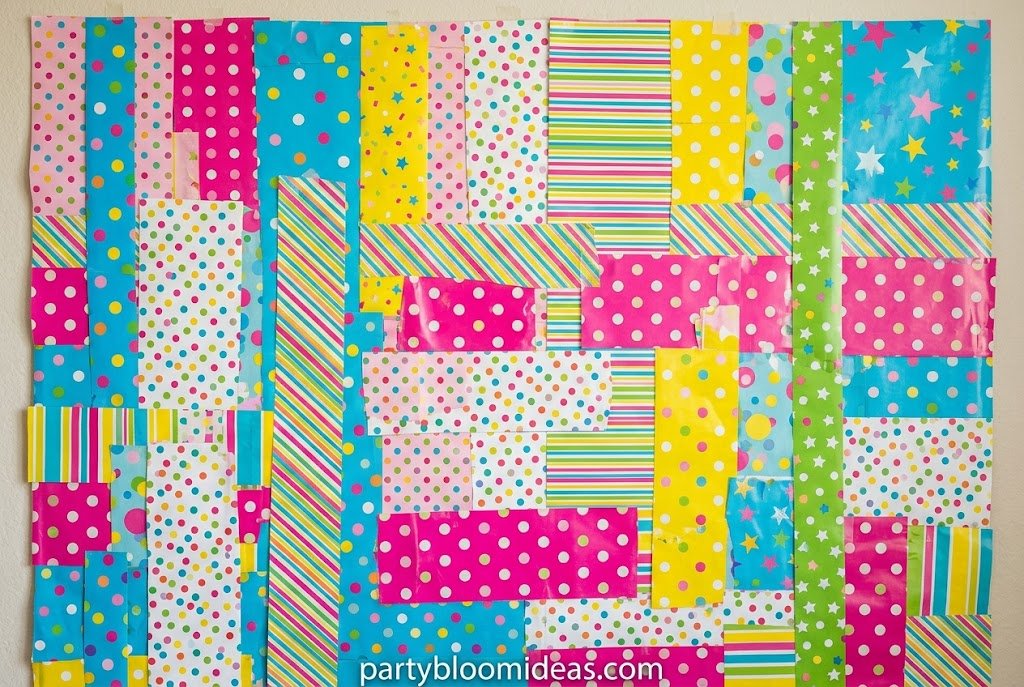
10. Wrapping Paper Backdrop
Best for: Last-minute parties, kids’ parties, any theme | Wow Factor: 6/10
Three to four matching sheets of large-format wrapping paper taped edge-to-edge on the wall. Sounds like cheating. It isn’t. Choose a bold geometric, a botanical print, or a solid metallic paper and it photographs surprisingly well. I attended a baby shower where the host used 4 sheets of dusty rose floral wrapping paper, a “Mom to Be” banner, and a ring light on a side table. The whole setup cost $18 and every single photo from that shower was taken in front of it.
Supplies:
- 3–4 rolls wrapping paper with cohesive pattern — $3–$6 (Dollar Tree, $1.25 per roll)
- Painter’s tape for wall — $3–$4 (already have it usually)
Total: $6–$10
Setup time: 15 minutes. Tape sheets edge to edge with the minimum visible seam. Add a banner or neon sign over it to personalize. This is the option for when you forgot you needed a photo backdrop until the morning of the party.
What Lighting Actually Does to a DIY Photo Booth
No section on DIY photo booths is complete without talking about lighting — because it matters more than the backdrop itself. I’ve tested this at enough parties to say it with full confidence.
Natural light from a north-facing window, during daylight hours, beats any ring light under $60. If you can position your photo booth so guests face an open window or shaded outdoor space (not direct sun, which creates harsh shadows and squinting), your photos will be better than anything a rented booth produces.
Ring lights are useful for evening events or indoor parties without windows. The $12–$14 clip-on versions from Amazon are sufficient for groups of 2–3 people. The 8-inch size works for selfies and couples; if you want group shots of 4–5, look for a 10-inch tripod ring light in the $20–$25 range.
What not to do: Never backlight the subject. If your backdrop is in front of a window, guests will be silhouetted. Position the light source in FRONT of the subject, aimed at their faces.
💡 Pro Tip: Test the setup with your own phone before guests arrive. Take two photos: one with the room lights on and one with just the ring light. You’ll immediately see which looks better — then adjust accordingly.
DIY Photo Booth vs. Rented Photo Booth: Is It Worth It?
| Feature | DIY Photo Booth | Rented Photo Booth |
|---|---|---|
| Cost | $12–$40 | $400–$800 for 3–4 hrs |
| Setup time | 15–120 minutes | Vendor handles it |
| Photo quality | iPhone/Android camera | Standard booth camera |
| Customization | Fully custom to your theme | Limited templates |
| Props | 6 curated props you choose | Generic pre-made props |
| Prints | Optional (phone > app > print) | Strips printed on-site |
| Portability | Fully reusable | Single-event rental |
| Attendant | You or a friend monitors | Vendor provides |
| Best for | Showers, birthdays, backyard parties | 100+ guest weddings |
Let’s be honest: rented photo booths make sense for large weddings where you need something hands-off and formal. According to The Knot’s Real Weddings Study (2024), 41% of couples incorporated a photo booth or selfie station into their wedding celebrations — but the growth in DIY versions outpaced rentals. For birthday parties, baby showers, graduation gatherings, and backyard events, a well-set-up DIY booth with good lighting produces photos guests actually prefer — taken on their own phones, sent directly to their camera rolls.
According to Pinterest Trends (2025), searches for “DIY photo booth backdrop” increased 67% year-over-year during spring party season (March through May), suggesting hosts are increasingly choosing the DIY route. And according to Eventbrite’s Party Trends Report (2023), photo booths and selfie stations ranked as the #2 most-requested party add-on for private events, behind only music and playlists.
Common DIY Photo Booth Mistakes to Avoid
The biggest mistake most hosts make is buying too many props. I’ve watched guests at party after party walk up to a table of 30 foam signs and pick up exactly nothing — too many options creates paralysis. Six curated props get used more than thirty generic ones. Keep it simple: two pairs of sunglasses, one hat or crown, one occasion-specific sign, one fun frame prop. Done.
Other common mistakes:
- Building the booth too close to the wall. Guests need at least 5–6 feet of clearance between the backdrop and where they’re standing to frame a proper shot. Measure this before you commit to a location.
- Not testing before guests arrive. Take 5 photos at the setup with your own phone. Check the framing, the lighting, and whether the backdrop is fully visible. Fix it before people show up.
- Using balloons outdoors in warm weather. They wilt, they pop, and a deflated balloon arch is worse than no arch.
- Skipping the horizontal phone orientation. Most guests default to vertical phone photos, but groups photograph better horizontal. Put a small sign: “Try landscape mode for group shots.”
- Forgetting to charge the ring light or bring extra batteries. It sounds obvious. It still happens.
🎉 Quick Summary
✅ Best for: Birthdays, bridal showers, baby showers, graduation parties, NYE, bachelorette events, backyard gatherings 💰 Budget range: $8–$40 for most setups ⏱ Setup time: 15 minutes (sequin curtain) to 2 hours (floral wall, balloon arch) 🌟 Top pick: Gold sequin curtain backdrop — fastest setup, highest visual impact, lowest cost 📌 Don’t skip: Test your lighting setup with your own phone before guests arrive — it’s the single most important variable
People Also Ask
How do you set up a photo booth at a party? Choose a location with good natural light or space for a ring light. Hang your backdrop (fabric, paper, or balloons) and ensure at least 5–6 feet of clearance between the backdrop and where guests will stand. Add a phone holder or tripod at eye level, set out 5–6 props, and test with your own phone before the party starts. The whole process takes 15–90 minutes depending on the backdrop style.
What’s the cheapest DIY photo booth backdrop you can make? A streamer fringe curtain from Dollar Tree metallic streamers costs about $8 and takes 30 minutes to assemble. A wrapping paper backdrop runs $6–$10 and takes 15 minutes. For under $15, both options photograph well in good lighting. The gold sequin tablecloth setup ($12–$14) is the most visually impressive option in this price range.
Do guests actually use photo booths at parties? Yes — consistently, across party types. In my experience hosting and attending 50+ parties, the photo area is almost always one of the highest-traffic spots. According to Eventbrite (2023), selfie stations ranked #2 among the most-requested party add-ons. The key variable is placement and lighting: a well-lit, easy-to-reach booth will be used continuously; a dark, cramped, or prop-heavy setup will be ignored after the first few guests.
Is a rented photo booth better than a DIY one? Not necessarily, and rarely for smaller events. A rented photo booth costs $400–$800 and produces standard-quality photos. A well-set-up DIY booth with a good backdrop and proper lighting produces photos guests take on their own phones — higher quality, immediately on their camera rolls, no strip-print format required. Rentals make sense for 100+ guest weddings where hands-off management is worth the premium.
What props should I put out at a DIY photo booth? Keep it to 6 or fewer. The most-used props across dozens of parties I’ve observed: one occasion-specific sign (“Class of 2026,” “She Said Yes,” “Turning 30 and Surviving”), one flower crown, two pairs of novelty sunglasses, and one hat. Skip the pre-packaged foam prop kits — they contain the same generic signs (“YOLO,” “LOL”) that photograph badly and feel dated. Make or print one or two occasion-specific signs and let the backdrop do the rest.
Frequently Asked Questions
How do you make a simple photo booth at home? Hang a backdrop — a sequin curtain, paper roll, or fabric panel — against a plain section of wall. Position it so guests face a light source (window or ring light). Set a phone on a tripod or holder at eye level 5–6 feet away. Add 4–6 props on a nearby table. Test with your own phone and adjust the framing before guests arrive. That’s it. Total setup time for the simplest version: 20 minutes.
What size should a DIY photo booth backdrop be? For single or couples photos: 4 feet wide × 5–6 feet tall is sufficient. For groups of 3–5: 6–8 feet wide × 6–7 feet tall. Most standard party spaces work with a 6-foot-wide setup — which is conveniently the width of three Dollar Tree tablecloths or a standard tension rod. Don’t go narrower than 4 feet or guests will be cropped out at the edges.
Do you need a ring light for a DIY photo booth? Not always. Natural light from a north-facing window during daytime events is better than most ring lights under $50. If you’re hosting in the evening or indoors without good natural light, a clip-on ring light ($12–$14 on Amazon) or small tripod ring light ($20–$25) is worth having. Position it at eye level or slightly above, aimed at guests’ faces, never from below.
How do you hang a photo booth backdrop without damaging walls? Command strips hold lightweight fabric and paper backdrops (up to 4–7 lbs per pair). For heavier setups, use a tension rod between two walls or doorframe, or build a freestanding PVC pipe frame. Painter’s tape works for paper and wrapping paper backdrops — it peels off without damaging paint. Avoid nails in rental apartments or spaces that charge for wall damage.
What’s the best backdrop for a homemade photo booth? The gold sequin curtain is the most versatile — it photographs well in any lighting, suits multiple party themes (birthday, NYE, bachelorette), and costs under $14. For more elegant occasions (bridal showers, garden parties), a faux floral wall or boho macramé frame is more appropriate. For kids’ parties, the kraft paper interactive backdrop or paper fan arrangement works well.
Can you make a photo booth without a printer? Yes, and most guests prefer it. The printed-strip format from rented booths is dated — photos go straight to guests’ phones from their own cameras, which is where they stay anyway. Skip the printer. If you want a physical keepsake element, set out a Polaroid camera instead (guests take one physical photo each), or create a designated Instagram/photo hashtag for the event.
What’s the difference between a photo booth and a selfie station? In practice, very little. A selfie station is typically a smaller, table-mounted setup — ring light, phone holder, small backdrop — designed for individual or couple selfies. A photo booth refers to a larger backdrop-and-props setup, often freestanding. Both serve the same purpose. The selfie station is better for small indoor spaces; the full backdrop setup is better for larger rooms or outdoor parties.
How do I keep guests using the photo booth all night? Placement matters most — if it’s in a corner behind the food table, nobody will find it. Position it near the entry or in the main social area. Add a “Photo Wall” sign with an arrow. Refresh the props once during the party (switch out a few items). If you have a group of early arrivals who love it, their photos on social media will pull others in. 9 times out of 10, the booth that gets used all night is the one with good lighting and easy access.
How do I make a balloon photo booth backdrop? Build a PVC pipe arch (two 10-foot pipes, elbow connector) or use a freestanding balloon column base from a party store. Thread 60–80 latex balloons in two coordinating colors onto a Dollar Tree balloon decorating strip, then wrap the strip around the arch frame. Keep to two colors maximum and vary the sizes — some 11-inch, some 5-inch. Total cost: $21–$23. Total time: 90 minutes. Note: skip this for outdoor summer events.
What lighting is best for an indoor party photo booth? For daytime indoor events: position the booth near a window so guests face natural light. For evening events: clip-on ring light (8 inches, $12–$14) at eye level for groups of 2–3, or a 10-inch tripod ring light ($20–$25) for larger groups. Warm white light (2700–3000K) is more flattering than cool white or daylight. Always position the light in front of the subject, never behind the backdrop.
Is it worth renting a photo booth for a birthday party? Only if your guest count is 80+ and you want something fully hands-off. For most birthday parties with 20–50 guests, a DIY setup costs $12–$40 and produces photos guests prefer — taken on their own phones, in their camera rolls immediately, higher resolution than most rental booth cameras. The $400–$800 rental price is hard to justify for a single-day event when the DIY version works this well.
How far should guests stand from the backdrop? Aim for 4–6 feet between the backdrop and the camera or phone tripod. Guests themselves stand about 1–2 feet in front of the backdrop. This gives enough space to frame individuals or small groups without the backdrop edge being visible. If your room doesn’t allow 6 feet of total depth, a tabletop selfie station is a better option.
What are the easiest DIY photo booth ideas for a last-minute party? The fastest options: (1) Gold sequin tablecloths from Dollar Tree + tension rod, 15 minutes, $14. (2) Wrapping paper backdrop taped to wall, 15 minutes, $6–$10. (3) Streamer fringe curtain, 30 minutes, $8–$13. All three use minimal materials, require no special skills, and photograph well in decent lighting.
Conclusion :
Here’s the thing about photo booths: they’re not about the backdrop. Not really. They’re about giving guests permission to be silly together, to do something slightly ridiculous, to have a photo on their phone from a specific moment on a specific night. Emma figured that out with her gold sequin curtain and shepherd’s hooks. You don’t need to be a designer or a decorator to create that. You need a clear wall, decent light, and a backdrop that doesn’t fight the people standing in front of it.
Start with the sequin curtain. Add the ring light if you’re hosting at night. Put out six props, not thirty. And test everything with your own phone before the party starts. That’s the whole system.
Read More : 20 kids Birthday Party Themes
25 Birthday Party Ideas for Adults
20 Father’s Day Party Ideas He Will Never Forget (2026)